Friday, May 29, 2009

8

Bacon Brocolli Mushroom Quiche


I still vividly remember the first ever time I tasted quiche. It was year 10 food tech lesson, we were making mini quiches - tiny tiny ones baked in mini muffin moulds. We used ready-made Pampas shortcrust pastry, and the filling was simply milk, egg, cheddar and bacon bits. I was initially a bit skeptic about some custardy-looking filling in a pastry shell. But I was blown away after I popped one of those in my mouth. It was really tasty, even if its just a simplified Quiche Lorraine with bacon bits.


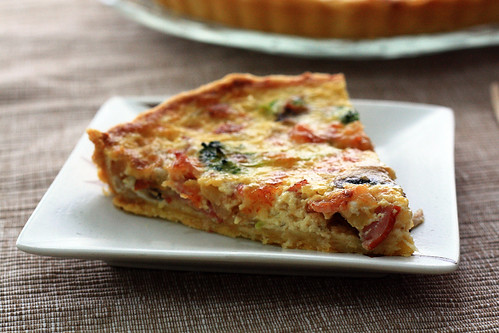
Yesterday, it was Dragon Boat Festival for us Chinese people, and as a public holiday, we had a day off school. I wanted to bake, of course! But something savoury. Initially I had planned to make this quiche for lunch...but I slept way over and ended up waking at 11am instead of 9. So this became our afternoon tea instead. This is the second time I've made a proper quiche before, and also the first time with milk only (i.e. no cream), but surprisingly the filling was still creamy, and filled with broccoli, bacon, mushroom, onion and Gruyere - it was delicious (and lower in fat, and healthy too, with the veggies added)! My mum, sister and I finished a whole 23-cm tart in 15 minutes flat!


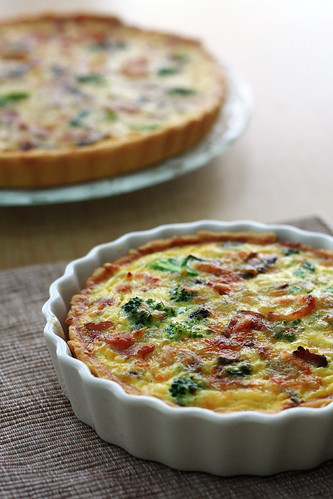
The recipe was from Use Real Butter (one of my favourite food blogs - especially the extemely detailed posts for Chinese food, Kaweah and the stunning scenery photos of the Rockies!). But then I realised I didn't have shortening at home, so I switched to a shortcrust pastry recipe from BBC Good Food instead. I rolled out the pastry very thinly, because I'm scared of uncooked soggy crusts. I also baked it in one 23-cm tart and one 17-cm dish.

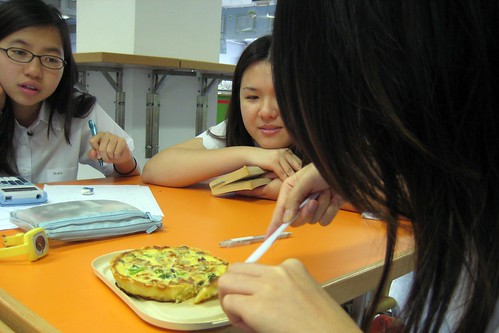
I took the small one (in the white dish) for lunch today, reheated in the microwave - still yummy! Pictured above are my friends snagging bits of my quiche haha. I was suprised that the pastry didn't go soggy though. Much better than the boring canteen lunch boxes (they almost dish up the same stuff everyday...I much prefer homemade food nowadays).

Quiche

Shortcrust Pastry Shell
Adapted from BBC Good Food

175g plain flour
80g cold butter , cut into pieces
1 egg yolk
5 tsp cold water
Pinch salt

1. Processor Method: put the flour, butter, egg yolk and 4 tsp cold water into a food processor. Using the pulse button, process until the mix binds.
Hand Method: Using a pastry cutter or your fingers, work/rub the butter into the flour until it dissapears - it should resemble coarse breadcrumbs. Make a well int the centre, sprinkle in the salt and add the yolk and water. Using your hands or a wooden spoon, gently mix until a ball of dough forms.
2. Tip the pastry onto a lightly floured surface, gather into a smooth ball, then roll out as thinly as you can.
3. Line a 23 x 2.5cm loose-bottomed, fluted flan tin, easing the pastry into the base (I also lined a 17-cm dish with the pastry). Trim the pastry edges with scissors (save any trimmings) so it sits slightly above the tin (if it shrinks, it shouldn't now go below the level of the tin).
4.Press the pastry into the flutes, lightly prick the base with a fork, then chill for 10 mins. Put a baking sheet in the oven and heat oven to 180 C
.
5. Line pastry case with foil, shiny side down, fill with dry beans and bake on the hot sheet for 15 mins. Remove foil and beans and bake for 4-5 mins more until the pastry is pale golden. If you notice any small holes or cracks, patch up with pastry trimmings. You can make up to this point a day ahead.


Filling
Adapted from Use Real Butter

3 eggs, beaten
1 1/2 cups milk
4 strips bacon, cooked and crumbled
1/2 medium onion, minced and sautéed
5 white button mushrooms, sliced and sautéed
1/2 head broccoli, chopped and blanched
1 cup gruyère, shredded
1 tbsp flour
1/4 tsp salt

Reduce oven to 160 C. In a large bowl, stir together the eggs, milk, onion, bacon, broccoli, mushrooms, and salt. In a separate bowl, reserve 2 tbsp of the cheese and toss the remaining cheese and flour together. Add the cheese to the rest of the ingredients and mix well. Pour into pie crust, sprinkle on the reserved cheese and bake 35-40 minutes (Mine only took 30minutes). Let quiche rest out of the oven for 15 minutes before serving (As Jen says, resting prevents any oozing of filling)

Tuesday, May 26, 2009

2

Chocolate Hazelnut Biscotti


Exams are over for me, but that does not mean that work is over (Biology IA, English World Lit Essay, Extended Essay...the list never ends). However, it does mean that I can manage to allocate a little more time for baking, instead of stuffing my face into a Biology or Chemistry or Maths textbook all the time.

I had some hazelnuts that I had to use up. And I haven't made biscotti before, so Chocolate Hazelnut Biscotti it was! Biscotti, meaning 'twice-baked' in its Latin name, is an Italian cookie. The dough is shaped into a long, wide log and baked for once to cook the outside. It is then cooled, and sliced into long fingers and baked again to crisp up the interior.

The original recipe I used was for pistachio biscotti, but I replaced it with hazelnuts. Me, being the lazy person I am, didn't shape the dough on a floured surface, but I just patted the dough into a pile, turned it onto the parchment paper and just shaped it with my hand and spatula into a rough-ish log, as pictured above.

The final product was wonderful straight from the oven - because of my mediocre slicing skills, some of the thinner biscotti snapped and I tried the broken pieces. The cookie was nice and crunchy, with pockets of melted chocolate chips and the lovely aroma of hazelnuts. I ate a few for breakfast the next day (despite keeping in a Ziploc and an airtight container, they became a bit soft), dunked in milk, and my sister had them dunked into her coffee. A happy start to a school day!

Chocolate Hazelnut Biscotti

Adapted from Martha Stewart's Cookies via Use Real Butter

2 cups flour
1/2 cup unsweetened cocoa powder
1 tsp baking soda (I reduced to 1/2 tsp for my elevation)
1/4 tsp salt
6 tbsp unsalted butter, room temperature
1 cup sugar
2 large eggs
1 cup shelled pistachios (try 3/4 cup) - I used the equivalent amount of hazelnuts, which I toasted, skinned and halved.
1/2 cup semisweet chocolate chips (just under) - I used the full half cup :)

1. Preheat oven to 350°F
2. Line a baking sheet with parchment paper
2. Whisk together flour, cocoa powder, baking soda, and salt. Set aside.
3. Beat the butter and sugar together on medium speed until light and fluffy.
4. Add eggs, beating on low speed until well combined. Scrape the sides of the bowl if necessary.
5. Add the flour mixture and beat to form a stiff dough. Mix in the hazelnuts and chocolate chips until just combined.
6. Transfer the dough to the parchment paper and form into a slightly flattened log, about 12×4 inches. Bake until slightly firm, about 25 minutes. Let cool for 5 minutes.
7. Reduce the oven to 300°F. On a cutting board, with a sharp serrated knife, cut the biscotti diagonally into 1-inch thick slices.
8. Arrange the cookies cut side down on the baking sheet. Bake until crisp but slightly soft in the center, about 8 minutes.
9. Move to a wire rack and cool completely. Store in a container at room temperature up to 1 week. Makes 1 dozen.

Friday, May 22, 2009

15

Mini Chocolate Cupcakes with Lemon Cream Cheese Frosting

chocolate cupcakes lemon cream cheese frosting
Exams. Are. OVER!

I'm finally back to baking, after two long weeks of school exams. By the end of my first week of Higher exams, I was already dreaming of what to bake. I was browsing some of my bookmarked recipes during my revision time allocated for Maths! Should I make some refreshing Matcha ice cream? Or bake some chocolate chip cookies that I knew everyone would like? A nice and simple chiffon cake might be good. Ah or I can bake some bread again to get rid of my stress whilst kneading...

chocolate cupcakes lemon cream cheese frosting
Finally, I settled on something I haven't made before -Mini Chocolate Cupcakes with Lemon Cream Cheese Frosting after stumbling by this post at Baking Obsession. I haven't made cream cheese frosting before so I though it'd be a nice try at something new!

chocolate cupcakes lemon cream cheese frosting
I didn't use the recipes stated on the site. The chocolate cupcake I used was from Cupcake Bakeshop. I've made this recipe several times, and it is my favourite basic chocolate cupcake so far - rich and chocolatey but not too heavy - a perfect pairing with any frosting. It is also a breeze to make! As for the frosting, I adapted the recipe from Simply Recipes.

chocolate cupcakes lemon cream cheese frosting
I brought these to school today (I baked 48 of these babies - I dare not think what will happen if my sister and I ate them all alone!) - and they we're a big hit. Everyone was squealing 'Omg they're sooo good!'. Which made me very happy, because at first I was scared that no-one would like the tangy frosting paired with the chocolate cupcake. I think this cupcake size is the best too - you won't feel guilty for picking up one...another one...and another one!

Baking really is the best stress relieving activity for me. Despite being very tired afterwards, it totally relaxed and forgot how I messed up some exams too :)

Chocolate Cupcakes
from Cupcake Bakeshop

Makes 48 mini cupcakes
1/2 cup (1 stick) butter, room temp
1-1/4 cups sugar
2 large eggs, room temp
3/4 cup flour
1/2 teaspoon baking powder
1/4 teaspoon baking soda
1/4 teaspoon salt
1/2 cup unsweetened cocoa powder
1/2 cup milk
1 teaspoons vanilla

1. Preheat oven to 375 degrees.
2. Beat butter until softened. Add sugar and beat until light and fluffy, about 3 minutes.
3. Add eggs, one at a time, beating until well combined.
4. Measure the flour, baking powder, baking soda, salt, and cocoa powder into a small sized bowl and whisk to combine.
5. Measure out the milk and vanilla and stir to combine
6. Add about a third of the dry ingredients to the butter/sugar and beat to combine. Add about a half of the milk/vanilla and beat to combine. Continue adding, alternating between dry and wet and finishing with the dry.
7. Scoop batter into cupcake cups about 2/3’s full. Turn oven down to 350 degrees and bake cupcakes for about 22-25 minutes (8-10 minutes for minis) or until a cake tester comes out clean.

Lemon Cream Cheese Frosting
Adapted from Simply Recipes

1/4 cup butter (1/2 stick) at room temperature
8oz Philly cream cheese (1 package) at room temperature
2 cups icing sugar, sifted (I used around 1 1/2 cups)
Grated zest of one large lemon
1-2 tsp lemon juice

1. With an electric mixer, beat the butter and cream cheese together, about 2 minutes on medium speed until very smooth. Scrape down the sides and bottom of the bowl to ensure even mixing.
2. Add the lemon zest and juice. Mix to combine. Slowly add the icing sugar. Keep adding until you get to your desired sweetness or consistency. (I chilled the frosting for 1/2 hour before using due to the hot/humid weather here, so piping would be more manageable)
3. Spoon into a piping bag fitted with a nozzle and decorate the cupcakes. (I used a large star tip).

Sunday, May 17, 2009

0

Cream Sauce Pasta


Sorry for the lack of updates! I haven't been baking much lately, because I am doing my school exams. I've just finished one week of my IB Higher Level exams, and this week, I will be doing my Standard Level ones. And on Thursday, when they all are done, I will bake again! Can't wait! :D

On Saturday it was only me and my sister, so I quickly made this pasta with ingredients from the fridge. I've been using this recipe for a long time, and it is really simple to make and it's tasty! Feel free to use whatever ingredients you have - here I used chicken fillet, mushroom and peppers. I usually use what I have on hand - bacon, sweet corn, onions, sausage...

Cream Sauce Pasta
The recipe is not a proper recipe, everytime I make this I don't measure out the ingredients - I just judge by eyesight and by tasting as I go along!
Serves 2-3

For the sauce:
250ml Heavy (whipping) cream
200-250ml Chicken broth
300g Dried pasta (any type, cooked to your liking)
1tsp cornflour
Salt, pepper
1 clove garlic
1 shallot (omit if using onion)
2tbsp olive oil

Chicken fillets
Bell peppers
Mushrooms

1. Prepare your chosen ingredients: cut/slice the chicken into bite size pieces, thinly slice peppers, slice mushrooms.
2. Mince the garlic and thinly slice the shallot.
3. Heat olive oil in a large pan; toss in the garlic and shallot and cook slightly until fragrant.
4. Add raw meat, and toss until cooked on the outside/slightly golden brown.
5. Stir in the cream, add the broth. Stir well.
6. Add in any vegetables or cooked ingredients. Cook until starting to boil.
7. Taste the sauce and season to your liking.
8. Dissolve cornstarch in a tablespoon or so of water; stir into sauce to thicken it.
9. Gently mix in pasta into the sauce to coat pasta well. Dish up and serve!

Tuesday, May 5, 2009

20

Serradura (aka Macau Sawdust Pudding)

serradura macau puddingSawdust Pudding. Doesn't sound very appealing, does it?

Apparently, 'serradura' translates to 'sawdust' in Portuguese. And the 'sawdust' in this dessert is actually...

serradura macau puddingCrushed Tea Biscuits! (Marie Biscuits)
Serradura is actually a layered chilled dessert made up of a sweetened, vanilla whipped cream and crushed biscuits. The creamy layer is a perfect match with the slightly rough biscuits.

This dessert, I believe, originates from Macau. The first time I went to Macau (just a 45-minute speed ferry journey), I bought this dessert from shop that first sold them, and I I felt like I was on the clouds. It had a lovely creamy, yet airy texture, but the biscuits are a wonderful interruption. But too bad no cafe in Hong Kong sold them back then :(

serradura macau puddingRecently, I found a cafe that replicated this dessert and did it justice. Well, it was even better than the Serraduras in Macau. (The other ones I've tried before are just no match - the cream not flavoured enough, too sweet, tastes like raw cream, wrong type of biscuits used...) Remembering that I've once seen a recipe for this before, I decided to re-create it in my kitchen.

As a first attempt, it wasn't bad, but I just couldn't replicate the exact flavour. Still investigating as to what the magic ingredient is. Vanilla seeds, maybe?


Recipe for Serradura (Macau/Sawdust Pudding)
From Cat's Blog (originally in Chinese, I've translated it here)

Ingredients
250ml Whipping cream
80g Marie biscuits (I used 100g)
50g Condensed milk
Vanilla essence (I used 2 tsp)

Method
1. Crush Marie biscuits finely. (I used the bash-it-in-a-Ziploc-with-rolling-pin method because I don't own a food processor)
2. Whip whipping cream to soft peaks. Add vanilla essence and condensed milk (Suggests you add 2/3 first, taste, then add more if it needs sweetening). Continue whipping until stiff peaks.
3. Transfer the cream into a piping bag. (fitted with a plain 1 or 2 cm nozzle)
4. Place a layer of biscuit into your vessel (individual moulds, mousse rings or cups) and pipe a layer of cream on top. Repeat until vessel is filled. (Suggests that don't put too much biscuit, or the cream will adhere to only the top bits and the dessert will look messy)
5. Chill in the freezer for two hours. When serving, leave it out for a bit (around 10 minutes) for it to soften.

serradura macau pudding chopper*My sister was hanging around whilst I was shooting these - and requested that I put one of her figures (Toni Toni Chopper from manga 'One Piece') in a photo...I quite like the result :)

Sunday, May 3, 2009

0

Recipe Index


Bread

Matcha and Chocolate Buns
Sun Dried Tomato Flatbread

Brownies
Cocoa Brownies
Smores Brownies

Cakes, Cupcakes and Muffins
Banana Coffee Muffins
Black and White Chocolate Cake
Caramel Macchiato Cupcakes
Chocolate Cupcakes with Chocolate Swiss Meringue Buttercream
Chocolate Espresso Mousse Cake
Matcha Chiffon Cake
Matcha Souffle Roll Cake
Mini Chocolate Cupcakes with Lemon Cream Cheese Frosting
Mochi Cakes - Matcha, Black Sesame, Chocolate
Spider Cupcakes
Tiramisu Cake

Cookies
Alfajores (Caramel/Dulce de Leche sandwich cookies)
Basic Shortbread
Chocolate and Hazelnut Biscotti
Earl Grey Tea Cookies
Lemon Cranberry Shortbreads
Matcha (Green Tea) Shortbread Cookies
Matcha and Cocoa Snowball Cookies
Pinwheel Cookies
Stained Glass Cookies
World Peace Cookies

Ice Cream and Frozen Desserts
Goma (Black Sesame) Ice Cream
Ice Cream Dorayaki
Matcha (Green Tea) Ice Cream
Adzuki (Red Bean) Ice Cream
Serradura (Macau/Sawdust Pudding)
Strawberry Sorbet

Other Sweets
Cookie-topped Cream Puffs
Lemon Cream Puffs
Homemade Dulce de Leche (milk caramel)
Homemade Popcorn


Savouries
Cream Sauce Pasta
Bacon and Brocolli Quiche
Japanese dishes: Hamburg Steak, Gyoza and Omurice


Friday, May 1, 2009

3

Matcha and Chocolate

matcha, chocolate, buns, matcha chocolate buns, bread, green, food, bakingThis was made two weeks ago, during my Easter holidays. No, I wasn't having a wonderful time relaxing, but I was slaving on my Geography coursework (which is now finished, thankfully).

I needed some stress relief. I hadn't baked in ages. So I decided to make bread. You know, the kneading and punching of dough is the best way to vent your frustration, and despite all the arm power used to knead, it is actually very therapeutic.

Many may ask that bread is so easily available at bakeries, why bother spending hours kneading, proofing and shaping just to make a few measly buns? Well, I personally think that fresh, piping hot homemade buns are just the reason why I do it. And, because I still think that being able to make soft, fluffy and tasty bread makes me feel pro, so I'm satisfying my inner ego as well :)

Okay, back to the recipe. Every time I want to make bread, I always turn to Happy Home Baker for her recipes. This time I chose this recipe, which seemed easy enough to make without me needing to run down to the supermarket to buy whipping cream or other ingredients.

So, the final product was wonderful fresh from the oven. The chocolate chips go really well with the refreshing taste of matcha, and the texture of the buns were just what I was looking for. And I'm pretty pleased with the result, maybe because the bottoms were not over baked and didn't turn dark brown. I blame this on my tiny, temperamental oven; sometimes I need to decrease baking temperatures by almost 20'C to get things baking without getting charred!

So, this was my first official food post on this site. Thanks for visiting my blog, and comments are very much appreciated!
7

About

Hi there everyone!

My name is Wendy and I am a (16) 17-year old IB student from Hong Kong. I've started this food blog because of my love for baking and the art of food photography. After getting enthralled by some gorgeously-styed photos on flickr and following (for a few years) some fantastic food blogs, I wanted to have mine too, but just never really got the time.

Well, My Buttery Fingers is actually not my first blog. I started one two years ago when I was 15 (still a carefree teenager with no work to do...), but I had to stop posting because I was doing my GCSE exams and I couldn't afford to procrastinate. Click here if you want to check it out.

Now I am doing the IB Programme, meaning I have to juggle six subjects (along with a plethora of other things) with baking and photography. But somehow, (on a whim?) I've decided to start fresh with this blog, because I figured out if I don't start now, I'll regret it. Being a busy high school student might mean that my posts here won't be as frequent as others, but I hope that will not discourage myself to keep posting as much as I can!

As a newbie into the food-bloggosphere, My Buttery Fingers is probably no different to other blogs. Prehaps no-one will even read this. Maybe the name is too lame that no-one will click it. But I don't mind, because its good enough for me to share my 'two cents' and to be part of this blogging family :)

Here are some other places where you can find me in the virtual world:
Check out my other photos on Flickr
Follow me on Twitter
Email me at 'wendy.au.yeung92@gmail.com'

Thank You for reading this (lengthy) introduction about the girl behind My Buttery Fingers! - Wendy


All Text and Photos (c) Wendy Au Yeung 2009

Blog Widget by LinkWithin