Saturday, July 23, 2011

3

Singapore

Merlion Park
Hi everyone! I just came back from a trip to Singapore! Since I haven't been baking much lately, I've decided to share some of the delicious food I had there!

Singapore is a multi-cultural city and its cuisine has Chinese, Malay, Indian, Nyonya and Western influences so I was able to eat lots of different things hehe. So we shall let the photos speak for themselves:

Hainanese Chicken Rice: I've had chicken rice three times in Singapore, and in my opinion "Five Star Hainanese Chicken Rice" had the best. Juicy and flavourful chicken + perfectly done rice - good enough to eat by itself or coupled with the chili, ginger or soya sauce.  
Nasi Lemak: Coconut rice accompanied by ikan bilis (fried anchovies), peanuts, fish cake, fried chicken wings and an egg. And of course a  generous dollop of sambal chilli sauce. The rice is very fragrant, but not too heavy to eat despite the addition of coconut milk to cook the rice.
Char Kway Teow: Stir-fried noodles with black sauce, bean sprouts, chives and preserved sausages. It's done over a strong fire so some bits were charred, but in a good way that it makes the noodles more tasty. 
Laksa: noodles, fishcake, prawns, egg, bean curd and sprouts cooked in a spicy coconut milk soup. Slurp slurp. 
And of course, the baker in me had to go try out some famous dessert places in Singapore too :D

Canele Patisserie Chocolaterie: I sampled two cakes - Le Royale (chocolate hazelnut mousse cake) and the Macha (green tea mousse + matcha biscuit + chestnut cremeux + almond crumble) - they are both heavenly! I wish I could go back and sample all their cakes!
Obolo Patisserie: Their macarons are simply awesome, mostly because of the huge amount of filling in them :)  The cakes here are New York Cheesecake, Le Cassis and Mango Passionfruit Cheesecake. I love how they are all intricately decorated! The cakes did not disappoint either - smooth cheesecakes but not too heavy. 
Flor Patisserie: A shop opened by the Japanese Chef Yamashita. We had the Strawberry Souffle Cheesecake  and the Berry Berries. Both were light and refreshing! 

Tom's Palette Ice Cream Parlour: they serve freshly made home-made ice cream, in a myriad of flavours -  salted egg yolk, chamomile, durian, melt and sizzle candy, rosemary and apple....I had the salted yuzu and salted caramel cheesecake flavours - I was in ice cream heaven, nuff said.

I also got the chance to have a chat with the owner, and he really does have a passion for experimenting flavours with ice cream - very inspiring. I say the hour or so spent in that shop was definitely one of the highlights of my trip!

So that's about it with regards to food I had in Singapore! Check out my Flickr Photostream for other pictures I took!

Wednesday, June 22, 2011

1

Lemon Cream Puffs


I've been trying to blog once a week this summer. Since the last time I wrote here, I started two summer jobs! So life has started to become busy again. Today I asked my boss if I could work at home instead, so it was kinda like a day off for me. So I baked. 

I've been spending alot of time flipping through my cookbooks and thought that cream puffs might be a good idea since I haven't had one since last summer! I chose the lemon cream puffs because it isn't a flavour that is offered at Beard Papa and it is a very summery flavour, perfect for the 30C+ temperature in Hong Kong right now.


These puffs are made of choux pastry spiked with some lemon zest, and there are two fillings inside - lemon curd and sweetened whipped cream. 

This is my first time making lemon curd and it's pretty similar to making the custard for ice cream! I'm glad that I didn't end up with any scrambled egg bits. However I found it to be a bit tart from my liking and my sister thought that it was a tad too buttery. I think I would prefer a meyer lemon curd, but I don't think any grocery store in Hong Kong sells them! 

Nevertheless, the whipped cream helped balance out the tartness of the lemon curd so the cream puff was still a delight to eat! I still haven't mastered how to make the choux pastry bake up really nice and crispy, so it was not as crunchy as I liked it to be. 


NEW! My Buttery Fingers is now on Facebook!
If you liked this post, go and give it a 'Like' - thank you for your support :)


Lemon Cream Puffs
Adapted from Chou Cream No Hon by Junko Iida

Makes 10-12 cream puffs

For the choux pastry
60g cake flour
40g unsalted butter, diced
50ml water
50ml milk
2g sugar
1g salt
2 eggs
2 tbsp lemon zest

Method for making the choux pastry is same as the one here, add in the milk with the water and stir in the lemon zest last. Oven times and temperatures are the same.

For the lemon curd
2 eggs
2 yolks
150g sugar
100ml lemon juice
80g unsalted butter, diced

Whisk together the eggs, yolks and sugar in a small saucepan. Heat over medium heat, whilst stirring until the mixture thickens slightly.
Off the heat, whisk in the lemon juice. Continue heating whilststirring until the mixture thickens to a pipeable consistency. Remove from the heat, mix in the butter until thoroughly incorporated. Cool the lemon
curd over an ice bath, stirring occasionally.

For the whipped cream
100ml whipping cream
15g sugar

Whip the cream and sugar to stiff peaks.

Assembly
Cut off the tops of the puffs, around 1/3 from the top. Pipein the lemon curd using a plain tip. 
Using a star tip, pipe a small mound of whipped cream on top. 
Serve immediately or the shells will become soggy.


Hehe my sister took this picture of Yoshi, waiting to devour the cream puffs :) 

Tuesday, June 14, 2011

4

Matcha Souffle Roll Cake


Alrighty, here comes the first food post of 2011! Even if it's already June!

Since I got back to Hong Kong, I've been more keen on making desserts that involve more Asian flavours. I've baked this matcha roll cake and two batches of matcha mochi cakes already! Maybe it's because I've had way too many chocolate and maple glazed doughnuts from Tim Hortons throughout the year that I kind of want to switch to other flavours!


This is my first time making a roll cake because I always found it to be scary, trying to roll up such a fragile cake - I mean, I'm bound to accidentally squish it somewhere or make all the filling leak out!

Flipping through my beloved collection of cookbooks that I couldn't bring to Canada, this was the first recipe that caught my eye. It's another one from a Japanese cookbook that is translated into Chinese. I really like these cookbooks because they often contain recipes that are hard to find online, and usually the flavours are very suitable to the Asian palate as they never too sweet and heavy.


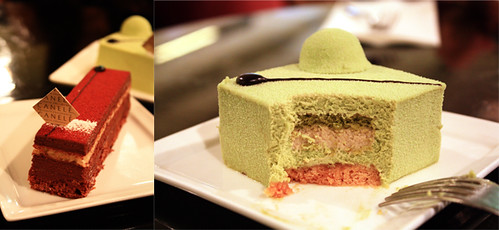
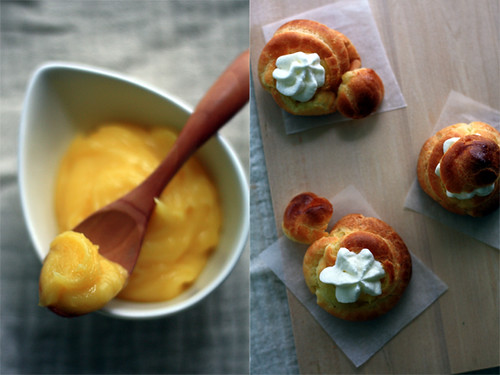
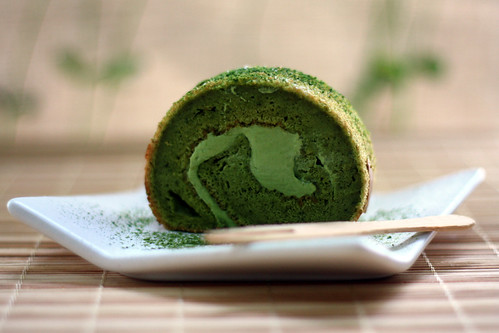
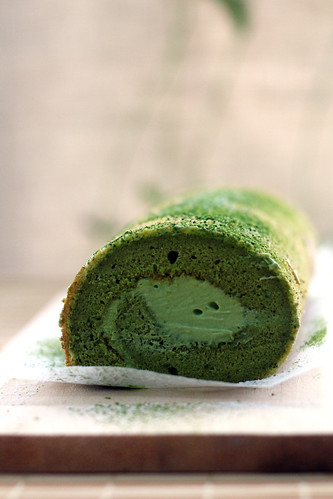
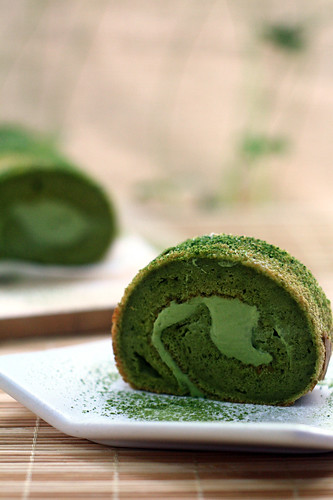
The roll cake turned out to be a success! The cake was really soft and cottony, and since it only uses vegetable oil it was very light but at the same time, it was also quite moist. The filling is a simple sweetened whipped cream spiked with matcha - can't go wrong with that, as it reminds you of matcha ice cream! It complemented the cake very well - a little bite of heaven in your mouth.

Matcha is really one of my favourite flavours in summer because it is just so refreshing, and the vibrant green colour really cheers you up. One tiny complaint is that I couldn't find Japanese canned ed beans (anko) at the grocery stores near me, because a thin layer of red bean filling on the cake, topped with the cream would be perfect!

Oh well, I guess that's another excuse to make this again when I can get my hands on the red beans!

NEW! My Buttery Fingers is now on Facebook!
If you liked this post, go and give it a 'Like' - thank you for your support :)


Matcha Souffle Roll Cake
adapted from 'wa sweet recipe' by Fukuda Junko 

Makes 1 cake roll baked in a 29cm x 29 cm pan

Cake
4 eggs, separated
70g sugar
30ml vegetable oil
60ml water
80g flour
10g matcha powder

Cream Filling
1tbsp matcha powder
2tbsp sugar
1tbsp hot water
150ml whipping cream

Optional: 100g red bean paste (in original recipe, I forgot to buy it), matcha powder and icing sugar for decoration

1. Preheat oven to 190C, sift together matcha powder and flour, line baking pan with parchment paper.
2. Prepare the cake: Whisk the egg yolks and 30g of the sugar together, add in the oil, combine, then water and finally the flour/matcha mixture. Lightly whisk until well combined.
3. Whip the egg whites with half the remaining sugar until frothy, add the remaining sugar and whip until soft peaks form.
4. Using a whisk, mix in 1/3 of the beaten egg whites with the flour mixture. Mix in the remaining egg whites with a light hand to prevent losing air bubbles. Switch to a spatula and fold the mixture until no streaks of white remain.
5. Spread the cake mixture onto the pan and even off the top. Bake at 190C for 12-15 minutes
6. Let the cake layer cool down slightly and cover with cling film or a moist tea towel, let rest until completely cool.
7. Prepare the cream filling: combine the matcha powder, sugar and hot water to form a smooth paste. Let cool.
8. Whip the whipping cream with the matcha paste mixture until it reaches a spreadable consistency.
9. Gently peel off the parchment paper from the cake and lay it on a sheet of cling film slightly larger than the cake itself. If using red bean paste, spread it over evenly onto the cake. Spread the cream filling evenly on, you might not need all of it (eat it - yum yum), leaving a slight border on one edge. Roll the cake up tightly, wrap the cling film around it and chill in the freezer for at least an hour.
10. Sift on icing sugar and matcha powder for decoration if desired.

Saturday, June 11, 2011

4

Finally...Back to Blogging!


(This is going to be a long post with good and bad news, but please bear with me!)

Um...Hello? Is anyone out there?

It's been a year since I last posted. I mean, one school year. Last August I began university in Montreal, and that was when I last posted - as a happy little freshman, enjoying the first week of school and new found freedom. But it didn't stay long like that.

I think the reason as to why I stopped blogging is pretty obvious - school. Although I've always taken my studies very seriously, I used to think I was pretty good at balancing school and fun, and baking did use to be what I did to take a break. But being it university just doesn't permit you to do so. When everyone around you is really hardworking, it's so hard to not follow. I don't even remember exactly why 'school' suddenly became so important to me.


My first semester was just...sad. Being away from home for so long meant that I was really homesick - sometimes I didn't even have an appetite (this is very rare for me) and I was so stressed out that I lost a lot of weight (first time in a few years!). Blogging was nowhere near the top of my priorities when you have textbooks to read, assignments to complete, groceries to buy, dinner to cook, apartment to clean, laundry to do...and the list goes on. Not to mention the depressing snow storms that I'm not used to at all! 

But I'm glad that my second semester was a lot better, because the support of my family (through skype), my new friends as we got closer, my fellowship small group and of course, Jesus :) so I think I did manage to adapt to university life after all, and I got to know myself more. I really want to say a huge THANK YOU to those people who have been there for me for this past year - and you know who you are!


ANYHOW, I am now back in Hong Kong for summer! Which means - back to blogging! I sincerely apologize for the long hiatus! That's the good news, and now comes the bad:

A few days ago when I was Googling my blog's name (as I was too lazy to type in the url on my sister's computer), I came across a Facebook page, as I thought coincidentally, named "My Buttery Fingers" too. Being curious, I clicked the link...only to find a strangely familiar 'About Me' section.

I proceeded to click on the link to the blog itself...and I was just utterly speechless. The owner of the blog took the liberty of not only copying my blog name, but also my tagline, and the EXACT same About Me section, only replacing my name and age with her's...what the heck?!

This was me when I saw the words 'my buttery fingers' on that site.
I don't even know where to start. At the very least, I am extremely annoyed and upset about someone copying from my site. And come on, why would you even need to copy the About Me page?! I guess this person doesn't really know herself. Maybe I should feel sorry for her because she has zero creativity and brainpower to even write an introduction about herself?

I don't want to link that site, but if you want to see it for yourself a simple search on Google will lead you there. I already emailed the blog owner, only to get a reply with no sincere apology and even a sentence from her that sounded as if it was perfectly alright to copy MY work. She still has not changed or deleted the content copied from me, and has downright refused to change her blog name because she is, apparently a "legal business". Pft.

Does anyone have suggestions as to what I can or should do now? 

Well, I am certainly not going to shut down my blog just because a silly imposter has decided to copy my work. I just think that my readers should be aware that I am not the one plagiarizing (because I created this blog earlier than she did). I am going to continue and share my work as I have before on My Buttery Fingers, so watch out for new posts with delicious desserts and photos!

Thank you for your support! 

PS: My Buttery Fingers (this blog, the real one) now has a Facebook page! Feel free to go give it a 'Like' if you enjoy reading my blog :)

Tuesday, September 7, 2010

13

Blueberry Muffins - Blogging from the Land of Maple Syrup!


Bonjour from Montreal! This is my first post since I've arrived in Canada around two weeks ago. I've started to settle in already - adapting to the colder weather, cooking for myself, getting around the city and - the most tedious parts - cleaning my room and doing the laundry. Nonetheless, I have been really enjoying my time here in this beautiful city (especially the frsh air, green grass and blue skies!) both during frosh week and just going around with friends. Here are some pictures taken around Montreal:


But the best part is that I have an oven in my apartment!! That means I'll get to contin
ue baking here! I was so happy to see it when I moved in. During grocery shopping the other day I finally picked up a few basic ingredients and I whipped up these blueberry muffins to share with my roommates.


In Hong Kong I never really had any good blueberries before because they're really expensive, but here they're considerably cheaper and a lot fresher too. I like eating my berries in a product more than by itself, so blueberry muffins were the perfect thing - easy to make and delicious to eat. I'm glad all my roommates like them (well they were gone by the end of the day) - permanent taste testers for this year!


These muffins are light, just sweet enough to balance the tang of the berries and have a delightfully, slightly crunchy top. I had some trouble figuring out how the oven works, and it seemed like they were not baking. I peeked inside the oven and it turns out that there is no heating element on the top, but somehow the tops browned as well. Can anyone help out here?


I also splurged and got myself a stick blender, so I've been whipping up berry-banana smoothies everyday for breakfast too. It's a real handy tool and I love it to bits! With the freedom to cook and eat whatever I want now, I'm sure I will be trying out many new recipes and dishes - can't wait to share them all with you, successful or not!

Anyway I have a class soon (yes I'm blogging in the library again) so I'll leave you with the link to the recipe from Smitten Kitchen. The only thing different I got was that the recipe made 12 muffins instead of 9 or 10 for me. And they are awesome drizzled with maple syrup :)
Blog Widget by LinkWithin