
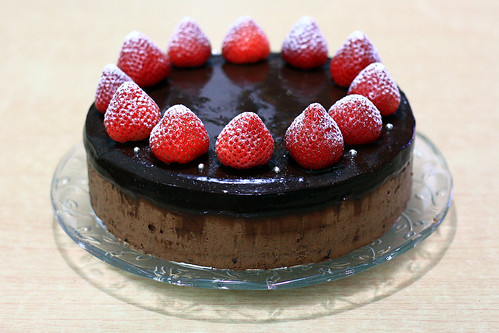
 This cake was made for a dear friend, that I've known since I was 10. I got to know her in Scouts. We see each other once a week, hangout on Saturday afternoons before our weekly Scout meeting, experienced hikes and camps together and it's been the same for 7 years! And, a few weeks ago it was her 18th birthday.
We just hanged out at her house with our normal group of friends, played some crazy twister and the UNO stacking tower, where the losers had to pick out a punishment from a bag. One of them involved kissing a plant, and I won't mention the crazier and disgusting ones here! We cut the cake at midnight, left a few slices for her parents and polished off the remaining next morning.

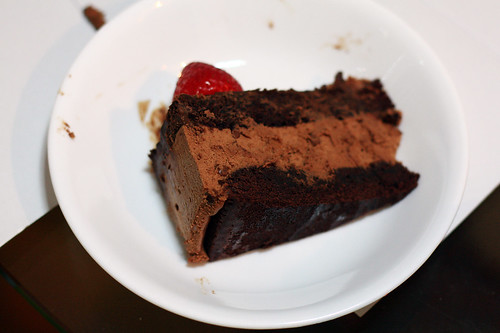
The recipe is from Tartlette, but I made a few modifications and additions to it. This chocolate cake is really a keeper, because it's moist and chocolaty, but also with a lovely soft texture that's not too dense. It would work really well with many other cakes. Maybe it's just the clumsy me, but I think its a bit fragile because I always tend to break it a bit when handling it! I brushed on some simple syrup spiked with rum to keep it moist because I made the cake layers one day in advance before assembling it.
The mousse is really nice too, albeit a bit rich for our palates. I think I'd cut down on the butter next time. However, it is again simple to make - no need to whip any egg whites and such. It also had a great silky and airy texture that accompanied the cake well. Because I was really scared that the mousse would melt or something in the sweltering heat whilst I was transporting it, I added some gelatine to set it a bit. I added some Varlhona crunchy perles for a bit of contrast, and a simple chocolate ganache glaze to top everything off.
And sorry for the lack of posts recently - in less than two weeks time I'm back at school, and I've got way too much stuff I haven't done. In fact, I'm writing this at the Central Libary right now, where I'm supposed to be working hard on my EE. (Hi Peter!)
Anyhow, I have been baking and making things - so I will eventually get around to posting those, so more will be coming soon!
Chocolate Espresso Mousse Cake
adapted from Tartlette
Serves 12
Cake:
1 stick (113gr) butter
1 cup (200gr) sugar
1/2 cup (45gr) natural cocoa powder
2 eggs
1 1/2 cups (185gr) all purpose flour
1 teaspoon (5gr) baking powder
1 teaspoon (5gr) espresso powder
1/2 teaspoon (2.5gr) baking soda
1 cup (250ml) warm water
Preheat oven to 325F. Butter two 8-inch round baking pans, sprinkle some flour into the pans, shake it around and tap the excess off. Line the bottoms with two 8 inch circles of parchment paper. Set aside.
In a mixer fitted with the paddle attachment, mix together the butter and sugar until light and creamy. On low speed, add the cocoa and mix until incorporated. Add the eggs, one at a time, beating well after each addition. Scrape the bowl with a spatula to make sure they are properly mixed in. Add the flour, baking powder, espresso powder and baking soda and mix on medium-low speed while slowly adding the warm water and mix until smooth. Divide the batter between the prepared pans and bake for 30 to 40 minutes or until a toothpick inserted in the middle comes out clean. Let cool to room temperature and unmold the cakes.
Soaking syrup:
15g sugar
15g water
1 tsp rum
Heat the sugar and water in a small saucepan over low heat until the sugar has dissolved. Let cool, stir in the rum and set aside.
Mousse:
6 oz semisweet chocolate, chopped
1/4 cup (62.5ml) whole milk
1 teaspoon espresso powder
1/2 stick (55gr) butter
1 egg yolk
1 cup (250ml) heavy cream, cold
1 tbsp kahlua
8g gelatine powder
15g water
30g Varlhona crunchy perles (optional)
In a bowl set over a pan of simmering water (make sure that the bowl fits snuggly over the pan and does not touch the water), melt together the chocolate, milk, espresso powder and butter. Remove from the heat and let cool to lukewarm. Meanwhile, sprinkle the gelatine over the water in a small bowl and let it bloom. Heat the bowl in a microwave for 10 seconds to liquefy the gelatine, stir until gelatine is dissolved. Whisk in the egg yolk, kahlua and cool gelatine mixture. In a mixer, whip the cream to medium peaks and fold it into the chocolate mixture. Lightly fold in the crunchy perles.
Ganache glaze:
70g semisweet chocolate, chopped
100g heavy cream
5g butter
Place the chopped chocolate in a bowl. Scald the cream and immediately pour it over the chocolate. Let it sit alone for 30 seconds, then stir until the mixture is smooth. Stir in the butter.
Assembly:
Prepare an 8-inch mousse ring (I don't have a mousse ring so I used a pan with a removable bottom). Place a cake layer on the bottom and soak the surface with the soaking syrup. Pour in the mousse and let it set for 10 minutes or so in the refridgerator. Soak both sides of the second layer with syrup and place it on the mousse. Pour over the ganache glaze and let the whole cake set, for at least 2-3 hours. Decorate as desired.
- I've actually made this cake before way way back in March for another friend. Last time, I added a crispy chocolate feuilltine layer to the mousse to add some extra texture, so you might want to add that if you make this cake.


14 Responses to “Chocolate Espresso Mousse Cake”
Happy Birthday to your friend! And let me jsut say that you would be my very best friend too making this amazing cake!!!!!!!!!! EXCELLENT work!!!! :)
it looks so cute! i bet it was delish!
i like your blog! :)
Now, that's a very lovely cake, as are the rest of the recipes you've posted so far. :)
Looks and sounds very intense!
Omg that looks so good >< lol
very nice, looks decadent in that slice picture.
Wendy, it's wonderful, congrats.
The person you made this cake for is really lucky to have as a baker as friend. ;)
I just made the Hazelnut Biscotti... But with Pistachios, like in the original recipe!
On "Use real butter" I read that is simpler to cut the biscotti if you let them cool and then you spritz them with a little water. Let them rest for 10 minutes; then you can cut them.
Bye, I hope you'll come back soon on your blog!
(ros)marina
Wow! Impressive baking. The cake looks absolutely fabulous! Can't believe you're just 17. Keep up the good work!
Hey,
It's beautiful! I read that you used a pan with removeable bottom, may I know how do you do it? I am afraid of destroying the cake. Pls pls give me your advice!
I will try baking this cake for my husband's birthday next month. =)
pris
Re: Pris
When I unmould cakes assembled with a pan with a removeable bottom, I usually use a hair dryer to slightly warm the sides of the cake so it slips out easier. Then I set the pan with the cake in it on top of a sturdy can, and gently 'twist' the pan so the cake comes out. Hope that helps and that your cake will come out great!
Hey thanks!
One more qs... how do you remove the bottom from the cake and transfer to those foiled covered bottom?
Re: Chubbchecks
I usually line my cake pan with a round of baking paper first, so after I've unmoulded the cake I gently slide a palette knife between the baking paper and the pan base and slide the cake onto the plate/foil base/cake box
Just stumbled across your blog looking for a great chocolate buttercream recipe and I MUST SAY you are an extremely gifted and talented young baker. Your pastries look delicious and your pictures just make them even more irresistable! Wonderful job on the blog, keep up the great work.
im so happy and i saw your blog,i just made one today following your recipe of course :D and its so perfect.. thank you for sharing this :D
Post a Comment