
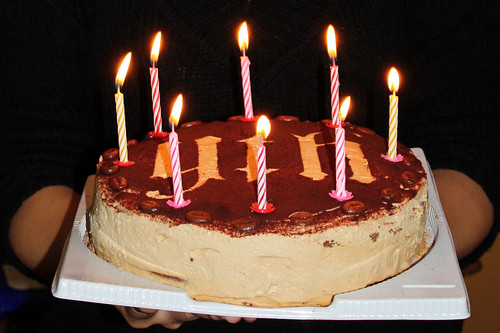
I hope everyone had a wonderful Christmas! This year, my Christmas was pretty quiet as my family ditched me for a holiday in Taiwan, whilst I spent three days alone at home revising and eating instant ramen for my Christmas dinner. The most enjoyable thing I did was probably going to my dear dear dear friend, YTH's birthday party.
 YTH is one of my high/secondary school friends, but over these 6-7 years, I think we've become pretty close friends. (YTH: I hope you agree!) She's one of those people that will know what I am thinking of on one moment of eye contact, and we usually share the same views and thoughts on the many things we discuss. She's also the first one I always consult when I have a problem, and she's always there to listen when I come across baking disasters. She also loves to write - take a look at her blog, and she'll take you through the torturous IB journey we're on right now, but not without hints of humour and sarcasm that always make me smile when I read.
Of course, I wouldn't even dream of showing up without a birthday cake. Since most of us are pretty sleep deprived and rely heavily on caffeine, I thought I'd might as well include it in the cake. Originally I wanted to make an Espresso Fudge Cake (since YTH always gets a Mocha whenever we're at Starbucks or PCC), but I didn't have much time on my hands, so I settled on making a simpler - but equally caffeine loaded - Tiramisu Cake.
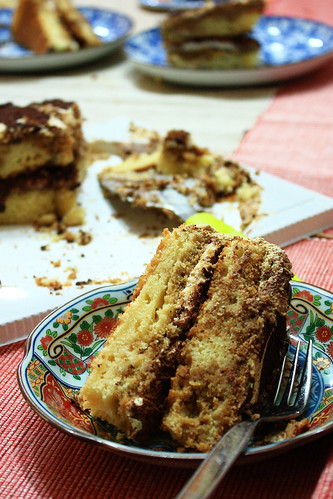
 This time the production of the cake went quite well, as only two main components were needed to be made - the yellow cake layer, and the filling/frosting mascarpone cream. I found the yellow cake to be a little dense and dry, and I think by soaking it with more espresso-rum syrup it will give a texture that is more similar than the classic Tiramisu.
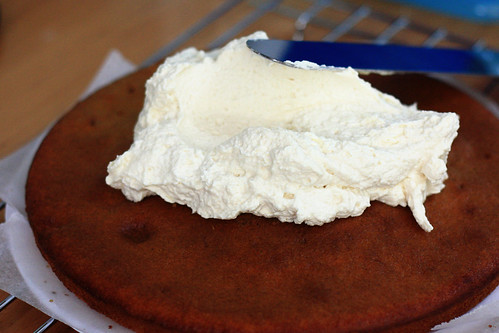
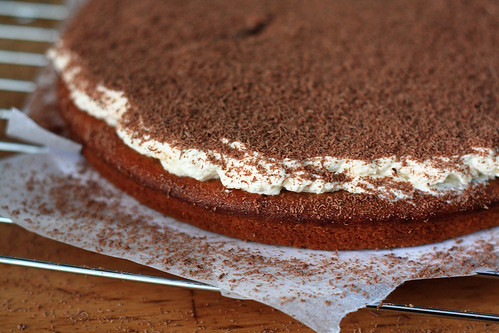 As for the filling and frosting, I can only say that I should have doubled the amount, because it is the best part of the cake! A smooth and creamy mascarpone concoction that is lightened with whipped cream and spiked with kahlua and espresso, I found it hard to restrain myself from eating it by the spoonful! Assembled along with the soaked cake layers and some finely chopped dark chocolate, the cake did resemble the flavour and texture of Tiramisu.
I really do like the idea of Tiramisu in the form of a cake, but next time I think I'll just go back to using lady fingers, but assemble the dessert inside a cake ring.
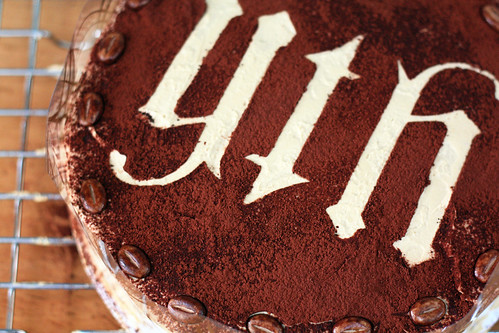
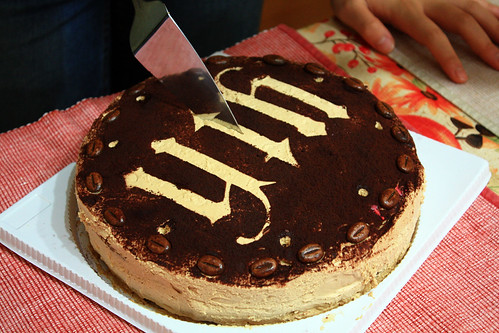 Although the cake itself tasted pretty good overall, the thing I'm most proud of is the decoration. Try looking at the first photo upside down - the design looks the same, because it's an ambigram! The idea was inspired by an ambigram that YTH drew a long time ago....Did I mention that she's an amazing calligrapher? The neatness of her handwriting is pretty scary, our Physics teacher once said that he thought it was typed!
The decoration was made by using a paper stencil. First I printed off an ambigram (from an ambigram generator that found using Google) and carefully cut out the text. Then I simply placed it onto the cake, and sieved over copious amounts of cocoa powder. Then comes to difficult bit - removing the paper stencil without spilling cocoa powder over the design. I found that the best way to do this is to use a pair of thin wire 'pliers' (pardon my English, I don't know what's the exact name of the tool), pinch one end of the stencil, and remove it quickly and swiftly in one direction so the cocoa spills on the 'dark' bit of the design, and not onto the 'light' bits.
This way of decorating probably works best for simple designs and shapes - hearts, stars smiley faces, or a single alphabet letter and numbers.
Or, you can make this cake for your New Year parties, and use a design saying '2010' for the decoration! And speaking of 2010, this will be the last post of 2009 - so I'll see you all again in 2010, and cheers to a better, happier and more fruitful year with more baking for everyone!
 Tiramisu Cake
From Dorie Greenspan's Baking: From My Home to Yours
For the cake layers:
2 cups (250g) cake flour
2 teaspoons baking powder
1/8 teaspoon baking soda
1/4 teaspoon salt
1 1/4 sticks (10 tablespoons, 142g) unsalted butter, room temperature
1 cup (200g) sugar
3 large eggs
1 large egg yolk
1 1/2 teaspoons pure vanilla extract
3/4 cup (180g) buttermilk
For the espresso extract:
2 tablespoons instant espresso powder
2 tablespoons boiling water
For the espresso syrup:
1/2 cup water
1/3 cup (66g) sugar
1 tablespoon amaretto, Kahlua, or brandy (I used rum)
For the filling and frosting:
1 8-ounce (224g) container mascarpone
1/2 cup (60g) confectioners’ sugar, sifted
1 1/2 teaspoons pure vanilla extract
1 tablespoon amaretto, Kahlua, or brandy (I used Kahlua)
1 cup(238g) cold heavy cream
2 1/2 ounces (70g) bittersweet or semisweet chocolate, finely chopped, or about 1/2 cup store-bought mini chocolate chips
Chocolate-covered espresso beans, for decoration (optional)
Cocoa powder, for dusting
Getting ready:
Center a rack in the oven and preheat the oven to 350 degrees F. Butter two 9×2 inch round cake pans, dust the insides with flour, tap out the excess, and line the bottoms of the pans with parchment or wax paper. Put the pans on a baking sheet.
To make the cake:
Sift together the cake flour, baking powder, baking soda, and salt.
Working with a stand mixer, preferably fitted with a paddle attachment, or with a hand mixer in a large bowl, beat the butter on medium speed until soft and creamy. Add the sugar and beat for another 3 minutes. Add the eggs one by one, and then the yolk, beating for 1 minute after each addition. Beat in the vanilla; don’t be concerned if the mixture looks curdled. Reduce the mixer speed to low and add the dry ingredients alternately with the buttermilk, adding the dry ingredients in 3 additions and the milk in 2 (begin and end with the dry ingredients); scrape down the sides of the bowl as needed and mix only until the ingredients disappear into the batter. Divide the batter evenly between the two pans and smooth the tops with a rubber spatula.
Bake for 28 to 30 minutes, rotating the pans at the midway point. When fully baked, the cakes will be golden and springy to the touch and a thin knife inserted into the centers will come out clean. Transfer the cakes to a rack and cool for about 5 minutes, then run a knife around the sides of the cakes, unmold them, and peel off the paper liners. Invert and cool to room temperature right-side up.
To make the extract:
Stir the espresso powder and boiling water together in a small cup until blended. Set aside.
To make the syrup:
Stir the water and sugar together in a small saucepan and bring just to a boil. Pour the syrup into a small heatproof bowl and stir in 1 tablespoon of the espresso extract and the liqueur or brandy; set aside.
To make the filling and frosting:
Put the mascarpone, sugar, vanilla, and liqueur in a large bowl and whisk just until blended and smooth.
Working with the stand mixer with the whisk attachment or with a hand mixer, whip the heavy cream until it holds firm peaks. Switch to a rubber spatula and stir about one quarter of the whipped cream into the mascarpone. Fold in the rest of the whipped cream with a light touch.
To assemble the cake:
If the tops of the cake layers have crowned, use a long serrated knife and a gentle sawing motion to even them. Place one layer right-side up on a cardboard round or a cake plate protected with strips of wax or parchment paper. Using a pastry brush or a small spoon, soak the layer with about one third of the espresso syrup. Smooth some of the mascarpone cream over the layer – user about 1 1/4 cups – and gently press the chopped chocolate into the filling. Put the second cake layer on the counter and soak the top of it with half the remaining espresso syrup, then turn the layer over and position it, soaked side down, over the filling. Soak the top of the cake with the remaining syrup.
For the frosting, whisk 1 to 1 1/2 tablespoons of the remaining espresso extract into the remaining mascarpone filling. Taste the frosting as you go to decide how much extract you want to add. If the frosting looks as if it might be a little too soft to spread over the cake, press a piece of plastic wrap against its surface and refrigerate it for 15 minutes or so. Refrigerate the cake too.
With a long metal icing spatula, smooth the frosting around the sides of the cake and over the top. If you want to decorate the cake with chocolate-covered espresso beans, press them into the filling, making concentric circles of beans or just putting some beans in the center of the cake.
Refrigerate the cake for at least 3 hours (or for up to 1 day) before serving – the elements need time to meld.


16 Responses to “Tiramisu Cake”
YAY! You found the time to blog, even in the midst of hardcore (I hope) revision! My stomach, and I will be forever grateful :D
I feel like a sentimental idiot saying this kind of thing, but it IS the end of 2009 and I think I'm entitled. So - thank you for the delicious cake and these years of friendship, and here's to hoping there will be many more.
Hey. That's another gorgeous creation. The ambigram IS amazing :) Keep baking and have a happy new year!
Thanks for sharing, this cake look gorgeous !!
Happy New Year to you !!
I still tilt my head side to side to look at the ambigram even though I've seen it so many times!
Happy New Year!
Beautiful, the cake sounds amazing and the ambigram is gorgeous.
Wow, I was just randomly wandering the blogosphere looking for new food blogs - this looks amazing, and so delicious! Keep baking, and stay creative, cheers!
How did you do those perfect letters! Great cake!
I love what you did to decorate the cake, quite a change from the traditional tiramisu yet just as good!
That looks fabulous and gorgeous!
YTH is lucky to have a friend like you to make her such delicious treats! The decoration is flawless, great job!
Tiramisu is one of the first thing I learned how to make and your take on Greenspan's version looks absolutely amazing!
YTH is so luck to have a friend like you.
Happy New Year!
I'm astonished - I had the same idea for a tiramisù-cake, but didn't do it yet. Wow, your one is gorgeous. The decoration. Wow! I don't understand the process to pull away the stencil without spreading the cocoa very well (everytime I tried to do it in the last years, it has been kind of disaster :P), but it doesn't matter... I'd like to bite it! XD
Happy 2010!
Thank you everyone! Happy New Year to all of you and happy baking :)
Wow, what a cake. I love how you used the stencil. Happy Birthday to your beloved friend!
Greetings from Vancouver! Having checked out your blog for a while and I am glad to see that your passion in baking is so fervent! Needless to say, your masterpieces look very yummilicious!!
Take care
Sylvanna
Say hi from Seattle :-D
Your cakes are lovely and look delishhhhh!
So am I a 17 year-old baker originally from Hong Kong, keep this passion going on!
Have a good day:-)
Kiki
Post a Comment