
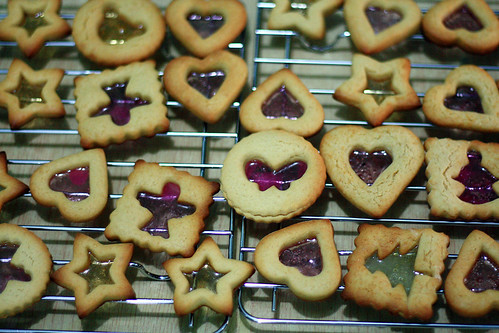
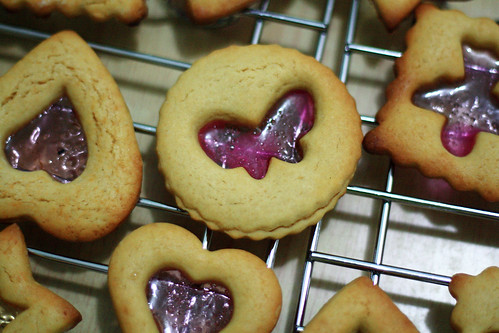
 First up are Stained Glass Cookies, the classical combination of shortbread with a clear pane of coloured sugar that lets whatever light shine through. I vividly remember seeing these cookies in a cookbook way back at my primary school library, and wondering how on earth do you make cookies with a translucent red, yellow or green centres. Back then, hammering fruit candies in a plastic seemed very daunting to the 10-year old me, which is probably why I haven't attempted these Christmas cookies until now.
I must admit that making these cookies were very fiddly indeed - the clumsy me just had to let something slip along the way, so I had candy shards falling onto the floor (well at least it wasn't the hammer falling onto my toes) and fingers accidentally touching hot trays from the oven. Sometimes I messed up the smaller cookie cutout and had to scrap that and start rolling again. The cookies are removed from the oven halfway through the baking time to put the candy in the space (this avoids the colours being discoloured and too many bubbles forming), and pushed into every nook and cranny using a toothpick.

And on the last note, I'd like to thank the readers who commented on my last post - it did give me a lot of encouragement to blog regularly (fingers crossed) again - I really appreciate it! Here's a virtual cookie for you, you and you for reading My Buttery Fingers :)

Adapted from Simply Recipes
Makes 20-40 cookies, depending on size (I got 44 cookies)
1/2 cup (1 stick. 114g) butter
1/2 cup (100g) sugar
1/4 cup (36g) brown sugar
1 tablespoon maple syrup (Original recipe called for molasses - I don't have or know what it is, would anybody like to enlighten me?)
1/2 teaspoon vanilla extract
1 egg
2 cups (250g) flour
1/4 teaspoon salt
3/4 teaspoon baking powder
30-40 hard candies, preferably in several flavors/colors (I used Fox fruit candies)
1. Pre-heat oven to 375°F (190C). Line two baking sheets with parchment paper or Silpat.
2. In a large bowl, using an electric mixer, cream together butter and sugars until fluffy, about 2 minutes. Add maple syrup and vanilla extract, mixing until incorporated. Add egg and mix until light and smooth, about 1 minute on medium speed.
3. Sift together flour, salt, and baking powder. Fold dry ingredients into wet mixture. Use electric mixer to blend just until flour is incorporated. Divide dough in half and flatten into two disks. Wrap disks in plastic wrap and refrigerate at least an hour and up to 2 days.
4. Remove any wrappers on candies and separate them by color into plastic bags (Place a towel in between to avoid bag tearing). Using a mallet to crush candies (they don't need to be all powdered - slightly larger shards will still melt fine).
5. Place one disk onto a floured surface (Elise suggests rolling in between waxed paper, which is of course less messy -but I stick to rolling on a floured surface to save paper) and roll to 1/4-inch (0.5cm) thickness. Use cookie cutters to cut dough into desired shapes.
6. Transfer cookies to prepared baking sheets, about 1 inch apart. Using a smaller cookie cutter or a knife, cut shapes into centers of cookies, reserving these center bits to add into extra dough. If cookies will be hung as ornaments or decorations, poke a small hole in the top of each cookie before baking
7. Bake for 4 minutes and remove from oven. Use a spoon to sprinkle the crushed candy into the hollowed-out centers of the cookies, using a toothpick to fill up to the edges. Carefully remove candy that has landed onto the cookie to avoid colouring of the dough.
8. Bake for 5-6 minutes more. The candy should be melted and bubbling and the cookies just barely beginning to brown. Remove baking sheets from oven and place on wire racks to cool. Allow cookies to cool on pans at least 10 minutes; otherwise, the candy centers may separate from the dough. When cookies are completely cooled, remove and store in an airtight container. String with ribbon if you want to hang as an ornament.


11 Responses to “Christmas Stained Glass Cookies”
Awesome!! Yay, I love following your blog and every new baking entry is a surprise for me. These are beautiful stained glass cookies man. 'am really glad to see you baking again :D (my blog is dead cause my DSLR is down but I've been baking alot too!)
Cheers,
Doreen of dollydoesdesserts
THEY WERE DELICIOUS!
Especially the chocolate one!
I LOVE YOUR BLOG, IT'S AMAZING.
:D
Is is sad that I post on practically every entry you write? LOOOL
I saw these in Martha Stuart Living and wondered how the sugar center was created.
Looks good!
Molasses is a byproduct of boiling down the juice of sugar cane or sugar beats. You get sugar, which is the desired result, and you get molasses, which is a strong-flavored sweet syrup. The most strongly flavored version is called "black-strap molasses."
It's similar in texture to honey, but the taste is somewhat different. More like brown sugar, if you have that in Hong Kong. (It's been awhile since I was there.)
In the early past of the last century, poor people living in the Southeastern part of the United States (also known as "The Old South") ate it on their biscuits because it was cheaper than sugar or honey.
Here's the wikipedia article on molasses:
http://en.wikipedia.org/wiki/Molasses
LOVE These!! Such a great holiday gift idea
Before I took a bite I thought it would be too sweet, but actually the crispy stained glass candy goes very well with the cookie!
These look elegant & gorgeous, Wendy!! It's OK as life can get very busy! No worries here ... As long as everything is on track, you're good! Here's my support for you!
Keep it up, gal!
Pei-Lin
I love the look of these cookies - so sparkly, pretty and festive! Delicious :)
I'm first time to your blog, and it look like you have a wonderful blog, I will check out more later. These cookies look awesome!!
Those cookies look amazing~ I'm so jealous of your friends who got to try them. Its the first time I've ever seen cookies with stained glass candy in the middle. I never imagined it, but now it seems like a superb concept. I hope to try it myself one day. :)
This is so pretty!!!! xD
Post a Comment