Showing posts with label japanese. Show all posts
Tuesday, June 14, 2011
4
Alrighty, here comes the first food post of 2011! Even if it's already June!
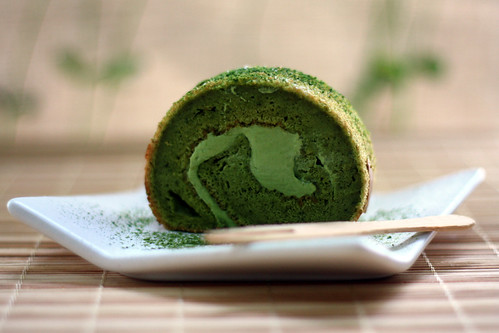
Since I got back to Hong Kong, I've been more keen on making desserts that involve more Asian flavours. I've baked this matcha roll cake and two batches of matcha mochi cakes already! Maybe it's because I've had way too many chocolate and maple glazed doughnuts from Tim Hortons throughout the year that I kind of want to switch to other flavours!
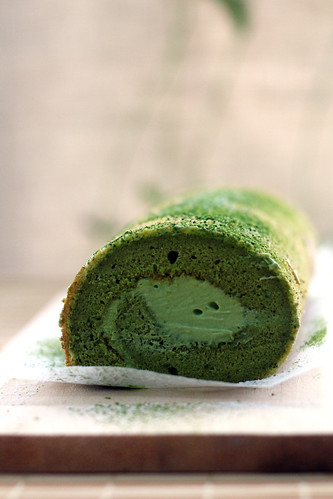
This is my first time making a roll cake because I always found it to be scary, trying to roll up such a fragile cake - I mean, I'm bound to accidentally squish it somewhere or make all the filling leak out!
Flipping through my beloved collection of cookbooks that I couldn't bring to Canada, this was the first recipe that caught my eye. It's another one from a Japanese cookbook that is translated into Chinese. I really like these cookbooks because they often contain recipes that are hard to find online, and usually the flavours are very suitable to the Asian palate as they never too sweet and heavy.
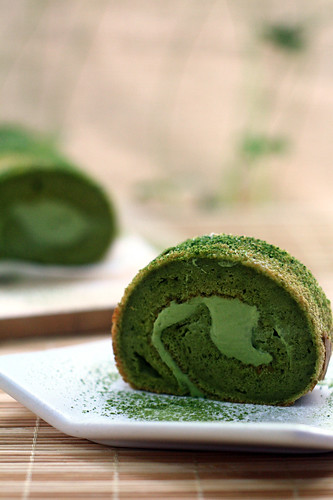
The roll cake turned out to be a success! The cake was really soft and cottony, and since it only uses vegetable oil it was very light but at the same time, it was also quite moist. The filling is a simple sweetened whipped cream spiked with matcha - can't go wrong with that, as it reminds you of matcha ice cream! It complemented the cake very well - a little bite of heaven in your mouth.
Matcha is really one of my favourite flavours in summer because it is just so refreshing, and the vibrant green colour really cheers you up. One tiny complaint is that I couldn't find Japanese canned ed beans (anko) at the grocery stores near me, because a thin layer of red bean filling on the cake, topped with the cream would be perfect!
Oh well, I guess that's another excuse to make this again when I can get my hands on the red beans!
NEW! My Buttery Fingers is now on Facebook!
If you liked this post, go and give it a 'Like' - thank you for your support :)
Matcha Souffle Roll Cake
adapted from 'wa sweet recipe' by Fukuda Junko
Makes 1 cake roll baked in a 29cm x 29 cm pan
Cake
4 eggs, separated
70g sugar
30ml vegetable oil
60ml water
80g flour
10g matcha powder
Cream Filling
1tbsp matcha powder
2tbsp sugar
1tbsp hot water
150ml whipping cream
Optional: 100g red bean paste (in original recipe, I forgot to buy it), matcha powder and icing sugar for decoration
1. Preheat oven to 190C, sift together matcha powder and flour, line baking pan with parchment paper.
2. Prepare the cake: Whisk the egg yolks and 30g of the sugar together, add in the oil, combine, then water and finally the flour/matcha mixture. Lightly whisk until well combined.
3. Whip the egg whites with half the remaining sugar until frothy, add the remaining sugar and whip until soft peaks form.
4. Using a whisk, mix in 1/3 of the beaten egg whites with the flour mixture. Mix in the remaining egg whites with a light hand to prevent losing air bubbles. Switch to a spatula and fold the mixture until no streaks of white remain.
5. Spread the cake mixture onto the pan and even off the top. Bake at 190C for 12-15 minutes
6. Let the cake layer cool down slightly and cover with cling film or a moist tea towel, let rest until completely cool.
7. Prepare the cream filling: combine the matcha powder, sugar and hot water to form a smooth paste. Let cool.
8. Whip the whipping cream with the matcha paste mixture until it reaches a spreadable consistency.
9. Gently peel off the parchment paper from the cake and lay it on a sheet of cling film slightly larger than the cake itself. If using red bean paste, spread it over evenly onto the cake. Spread the cream filling evenly on, you might not need all of it (eat it - yum yum), leaving a slight border on one edge. Roll the cake up tightly, wrap the cling film around it and chill in the freezer for at least an hour.
10. Sift on icing sugar and matcha powder for decoration if desired.
Matcha Souffle Roll Cake
Alrighty, here comes the first food post of 2011! Even if it's already June!
Since I got back to Hong Kong, I've been more keen on making desserts that involve more Asian flavours. I've baked this matcha roll cake and two batches of matcha mochi cakes already! Maybe it's because I've had way too many chocolate and maple glazed doughnuts from Tim Hortons throughout the year that I kind of want to switch to other flavours!
This is my first time making a roll cake because I always found it to be scary, trying to roll up such a fragile cake - I mean, I'm bound to accidentally squish it somewhere or make all the filling leak out!
Flipping through my beloved collection of cookbooks that I couldn't bring to Canada, this was the first recipe that caught my eye. It's another one from a Japanese cookbook that is translated into Chinese. I really like these cookbooks because they often contain recipes that are hard to find online, and usually the flavours are very suitable to the Asian palate as they never too sweet and heavy.
The roll cake turned out to be a success! The cake was really soft and cottony, and since it only uses vegetable oil it was very light but at the same time, it was also quite moist. The filling is a simple sweetened whipped cream spiked with matcha - can't go wrong with that, as it reminds you of matcha ice cream! It complemented the cake very well - a little bite of heaven in your mouth.
Matcha is really one of my favourite flavours in summer because it is just so refreshing, and the vibrant green colour really cheers you up. One tiny complaint is that I couldn't find Japanese canned ed beans (anko) at the grocery stores near me, because a thin layer of red bean filling on the cake, topped with the cream would be perfect!
Oh well, I guess that's another excuse to make this again when I can get my hands on the red beans!
NEW! My Buttery Fingers is now on Facebook!
If you liked this post, go and give it a 'Like' - thank you for your support :)
Matcha Souffle Roll Cake
adapted from 'wa sweet recipe' by Fukuda Junko
Makes 1 cake roll baked in a 29cm x 29 cm pan
Cake
4 eggs, separated
70g sugar
30ml vegetable oil
60ml water
80g flour
10g matcha powder
Cream Filling
1tbsp matcha powder
2tbsp sugar
1tbsp hot water
150ml whipping cream
Optional: 100g red bean paste (in original recipe, I forgot to buy it), matcha powder and icing sugar for decoration
1. Preheat oven to 190C, sift together matcha powder and flour, line baking pan with parchment paper.
2. Prepare the cake: Whisk the egg yolks and 30g of the sugar together, add in the oil, combine, then water and finally the flour/matcha mixture. Lightly whisk until well combined.
3. Whip the egg whites with half the remaining sugar until frothy, add the remaining sugar and whip until soft peaks form.
4. Using a whisk, mix in 1/3 of the beaten egg whites with the flour mixture. Mix in the remaining egg whites with a light hand to prevent losing air bubbles. Switch to a spatula and fold the mixture until no streaks of white remain.
5. Spread the cake mixture onto the pan and even off the top. Bake at 190C for 12-15 minutes
6. Let the cake layer cool down slightly and cover with cling film or a moist tea towel, let rest until completely cool.
7. Prepare the cream filling: combine the matcha powder, sugar and hot water to form a smooth paste. Let cool.
8. Whip the whipping cream with the matcha paste mixture until it reaches a spreadable consistency.
9. Gently peel off the parchment paper from the cake and lay it on a sheet of cling film slightly larger than the cake itself. If using red bean paste, spread it over evenly onto the cake. Spread the cream filling evenly on, you might not need all of it (eat it - yum yum), leaving a slight border on one edge. Roll the cake up tightly, wrap the cling film around it and chill in the freezer for at least an hour.
10. Sift on icing sugar and matcha powder for decoration if desired.
Sunday, July 12, 2009
8
Ice Cream Dorayaki
Wow. It's been three weeks since I've updated My Buttery Fingers! Although it's summer, I haven't been baking much. Here are some excuses: It's too hot. I have too much school work to do - EE, university applications, homework, revision and more revision. And work experience (for me, that's two weeks at a lab. It's really fun though!)
I might have not been in the mood to bake, but I was definitely in the mood for ice cream. More ice cream, I should say - but that's the only thing I've been churning out, so I apologise for the bombardment of posts about ice cream on my blog! But again, everyone screams for ice cream...right?

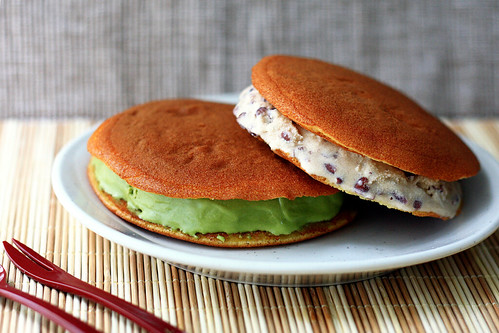
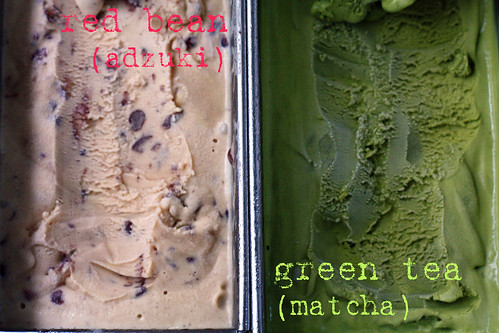
But this post isn't just about ice cream. It's about a twist on Dorayaki, a Japanese snack which is basically two pancakes sandwiched with a slather of red bean paste (anko). Here, its been transformed to an ice cream sandwich of some sorts - I've made Dorayaki filled with Matcha (green tea) and Red Bean Ice Cream.
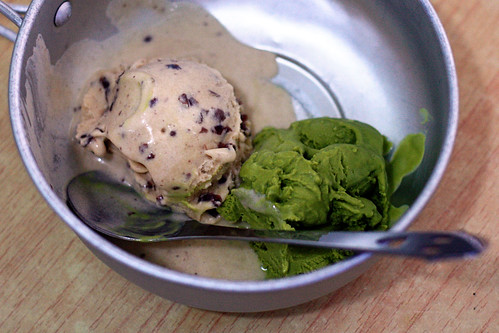
Matcha ice cream is already a family favourite after making it a few times last summer. It's really refreshing, and the subtle bitter aftertaste is a great match with the creamy base, making it popular with the adults too.
Red bean, however, was a new attempt. And I was glad I made that attempt, because the ice cream is SO GOOD. I understand that beans in ice cream may not be something everyone would like, but please please please let me tell you about it: it's creamy, it has a great texture with the soft beans contrasting with the smooth, red bean infused ice cream base, and the rich milky flavour is just the perfect match with the mild sweetness of the red beans.

The fluffy and fragrant little pancakes are also great with the ice cream. I think the final product looks really cute! Maybe I'll try making mini ones next time. These can be made ahead so they are ready when you are craving for a refreshing afternoon snack or dessert - just wrap them individually in cling film and store in the freezer. I'm sure that other Japanese ice cream flavours would be a great pairing too - black sugar, tofu or black sesame.
But of course, the ice creams are also wonderful eaten on its own. A quote from FoodWishes.com:
"Stop Screaming for Ice Cream and Start Making Some." Enjoy! :D
Matcha (green tea) Ice Cream
Adapted from Ice Cream Book, by Junko Fukuda (original recipe in Chinese)
3tbsp Matcha powder
150ml Milk
2 Egg yolks
70g + 3tbsp sugar (measure separately)
120ml Whipping cream
1. In a small bowl, whisk together 3 tbsp of sugar with the matcha powder until smooth.
2. In a separate large bowl, whisk together 70g sugar and the egg yolks until pale yellow.
3. Heat the milk in a small saucepan until just about to boil.
4. Mix the yolks and the milk, adding the milk in small portions (so you don't end up with scrambled eggs!)
5. Pour the rest of the mixture (the custard) back into the pan. Heat the mixture over low heat, stirring constantly until the mixture thickens - it should coat the back of a wooden spoon.
6. Take a few tbsp of the custard and mix it with the matcha-sugar mixture. Dissolve it into the rest of the custard base. Strain the custard.
7. Place the bowl over an ice bath to cool, stirring occasionally. Chill the mixture until thoroughly cold.
8. Mix the cream into the cold ice cream mixture.
9. Churn the ice cream in an ice cream maker, for around 20 minutes (time may differ according to your machine).
10. Transfer to an air tight container and chill until ice cream sets.
Red Bean Ice Cream
Adapted from Ice Cream Book, by Junko Fukuda (original recipe in Chinese)
100ml Milk
2 Egg yolks
55g sugar
150g Red bean paste (anko) (tsubushian - the type that still has some whole beans in it)
150ml Whipping cream
1. In a large bowl, whisk together sugar and egg yolks until pale yellow.
2. Heat the milk in a small saucepan until just about to boil.
3. Mix the yolks and the milk, adding the milk in small portions (so you don't end up with scrambled eggs!)
4. Pour the rest of the mixture (the custard) back into the pan. Heat the mixture over low heat, stirring constantly until the mixture thickens - it should coat the back of a wooden spoon.
5. Strain the custard. Place the red bean paste in a large bowl, and mix in the custard.
7. Place the bowl over an ice bath to cool, stirring occasionally. Chill the mixture until thoroughly cold.
8. Mix the cream into the cold ice cream mixture.
9. Churn the ice cream in an ice cream maker, for around 20 minutes (time may differ according to your machine).
10. Transfer to an air tight container and chill until ice cream sets.
Ice Cream Dorayaki
Adapted from Ice Cream Book, by Junko Fukuda (original recipe in Chinese)
Makes 10 pancakes/5 sanwiches
2 eggs
80g sugar
1tbsp honey
2tbsp water
100g cake flour
1/2tsp baking powder
Oil for greasing pan (something mild like vegetable oil, NOT butter - it think it's too rich)
Ice cream of your choice
1. Beat eggs and sugar together until pale in colour. Mix in the honey and water.
2. Sift in the flour and baking powder, mix together gently until no lumps remain.
3. Chill mixture for one hour.
4. Before frying the pancakes, mix the batter thoughrougly again. Have a wet cotton towel ready. Heat a non stick frying pan over medium heat and brush on a thin layer of oil. Remove the pan from heat and place on the wet towel to cool down the pan.
5. Using a ladle or measuring cup, pour in some batter to form a 10cm circle. Put on a lid, and cook the pancake over extreme low heat.
6. When bubbles appear on the pancake, flip it and cook until slightly brown. Cool on a wire rack. Repeat with rest of the batter.
7. Leave the ice cream to soften for a bit. Sandwich the ice cream in between two pancakes of similar size and shape, shaping it with your hand to even out the ice cream. Freeze again to harden the ice cream.
8. If not consuming immediately, wrap each dorayaki individually in plastic wrap and store in freezer.
I might have not been in the mood to bake, but I was definitely in the mood for ice cream. More ice cream, I should say - but that's the only thing I've been churning out, so I apologise for the bombardment of posts about ice cream on my blog! But again, everyone screams for ice cream...right?
But this post isn't just about ice cream. It's about a twist on Dorayaki, a Japanese snack which is basically two pancakes sandwiched with a slather of red bean paste (anko). Here, its been transformed to an ice cream sandwich of some sorts - I've made Dorayaki filled with Matcha (green tea) and Red Bean Ice Cream.
Red bean, however, was a new attempt. And I was glad I made that attempt, because the ice cream is SO GOOD. I understand that beans in ice cream may not be something everyone would like, but please please please let me tell you about it: it's creamy, it has a great texture with the soft beans contrasting with the smooth, red bean infused ice cream base, and the rich milky flavour is just the perfect match with the mild sweetness of the red beans.
The fluffy and fragrant little pancakes are also great with the ice cream. I think the final product looks really cute! Maybe I'll try making mini ones next time. These can be made ahead so they are ready when you are craving for a refreshing afternoon snack or dessert - just wrap them individually in cling film and store in the freezer. I'm sure that other Japanese ice cream flavours would be a great pairing too - black sugar, tofu or black sesame.
"Stop Screaming for Ice Cream and Start Making Some." Enjoy! :D
Matcha (green tea) Ice Cream
Adapted from Ice Cream Book, by Junko Fukuda (original recipe in Chinese)
3tbsp Matcha powder
150ml Milk
2 Egg yolks
70g + 3tbsp sugar (measure separately)
120ml Whipping cream
1. In a small bowl, whisk together 3 tbsp of sugar with the matcha powder until smooth.
2. In a separate large bowl, whisk together 70g sugar and the egg yolks until pale yellow.
3. Heat the milk in a small saucepan until just about to boil.
4. Mix the yolks and the milk, adding the milk in small portions (so you don't end up with scrambled eggs!)
5. Pour the rest of the mixture (the custard) back into the pan. Heat the mixture over low heat, stirring constantly until the mixture thickens - it should coat the back of a wooden spoon.
6. Take a few tbsp of the custard and mix it with the matcha-sugar mixture. Dissolve it into the rest of the custard base. Strain the custard.
7. Place the bowl over an ice bath to cool, stirring occasionally. Chill the mixture until thoroughly cold.
8. Mix the cream into the cold ice cream mixture.
9. Churn the ice cream in an ice cream maker, for around 20 minutes (time may differ according to your machine).
10. Transfer to an air tight container and chill until ice cream sets.
Red Bean Ice Cream
Adapted from Ice Cream Book, by Junko Fukuda (original recipe in Chinese)
100ml Milk
2 Egg yolks
55g sugar
150g Red bean paste (anko) (tsubushian - the type that still has some whole beans in it)
150ml Whipping cream
1. In a large bowl, whisk together sugar and egg yolks until pale yellow.
2. Heat the milk in a small saucepan until just about to boil.
3. Mix the yolks and the milk, adding the milk in small portions (so you don't end up with scrambled eggs!)
4. Pour the rest of the mixture (the custard) back into the pan. Heat the mixture over low heat, stirring constantly until the mixture thickens - it should coat the back of a wooden spoon.
5. Strain the custard. Place the red bean paste in a large bowl, and mix in the custard.
7. Place the bowl over an ice bath to cool, stirring occasionally. Chill the mixture until thoroughly cold.
8. Mix the cream into the cold ice cream mixture.
9. Churn the ice cream in an ice cream maker, for around 20 minutes (time may differ according to your machine).
10. Transfer to an air tight container and chill until ice cream sets.
Ice Cream Dorayaki
Adapted from Ice Cream Book, by Junko Fukuda (original recipe in Chinese)
Makes 10 pancakes/5 sanwiches
2 eggs
80g sugar
1tbsp honey
2tbsp water
100g cake flour
1/2tsp baking powder
Oil for greasing pan (something mild like vegetable oil, NOT butter - it think it's too rich)
Ice cream of your choice
1. Beat eggs and sugar together until pale in colour. Mix in the honey and water.
2. Sift in the flour and baking powder, mix together gently until no lumps remain.
3. Chill mixture for one hour.
4. Before frying the pancakes, mix the batter thoughrougly again. Have a wet cotton towel ready. Heat a non stick frying pan over medium heat and brush on a thin layer of oil. Remove the pan from heat and place on the wet towel to cool down the pan.
5. Using a ladle or measuring cup, pour in some batter to form a 10cm circle. Put on a lid, and cook the pancake over extreme low heat.
6. When bubbles appear on the pancake, flip it and cook until slightly brown. Cool on a wire rack. Repeat with rest of the batter.
7. Leave the ice cream to soften for a bit. Sandwich the ice cream in between two pancakes of similar size and shape, shaping it with your hand to even out the ice cream. Freeze again to harden the ice cream.
8. If not consuming immediately, wrap each dorayaki individually in plastic wrap and store in freezer.
Friday, June 19, 2009
14
First Ice Cream of 2009
What time is it?

Summer time!
Sorry for the bad 'joke'. I quote my friend for this...but it did make me laugh! But back to the point. Its summer time, its time for the beach, time for 10 hours of sleep, which also means time for ice cream!
I've had an ice cream maker at home for ages, but I never really tried making proper ice cream until last summer. I tried out many new things last summer because my holiday was super long (since I just had my GCSE exams) and had nothing much to do, so I baked a lot and tried many new things!

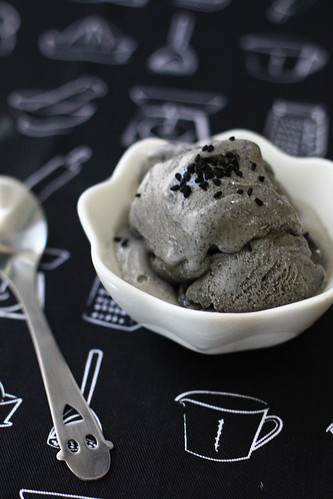
The first flavour of ice cream up this year is something special that I haven't tried before - Goma (Black Sesame) Ice Cream. This Japanese flavour gives off a rich nutty aroma, contrasting with the creamy texture of the ice cream. Two forms of black sesame is used to enhance the flavour - sesame paste and ground sesame seeds, which resulted into an ice cream that is way more flavourful than the store-bought ones. Even my mum who doesn't have much of a sweet tooth loved it!
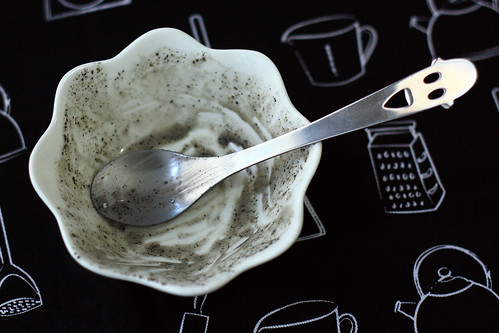
Pardon me for the poor photos - it's actually really hard to take good photos of ice cream here because of the hot and humid weather (even the aircon doesn't help much). But do try this ice cream flavour - it's just so good. See, the bowl was licked clean precisely one minute after the photo shoot!
Goma (black sesame) Ice Cream
Adapted from Ice Cream Book, by Junko Fukuda (original recipe in Chinese)
60g Black sesame paste
180ml Milk
2 Egg yolks
70g + 2tbsp sugar (measure separately)
120ml Whipping cream
1tbsp Ground black sesame seeds
1. In a large bowl, whisk together 2 tbsp of sugar with the black sesame paste until smooth.
2. In a separate large bowl, whisk together 70g sugar and the egg yolks until pale yellow.
3. Heat the milk in a small saucepan until just about to boil.
4. Mix the yolks and the milk, adding the milk in small portions (so you don't end up with scrambled eggs!)
5. Pour the mixture (the custard) back into the pan. Heat the mixture over low heat, stirring constantly until the mixture thickens - it should coat the back of a wooden spoon.
6. Strain the custard. Mix the custard with the black sesame mixture, adding the custard in small portions (or the mixture will separate).
7. Place the bowl over an ice bath to cool, stirring occasionally. Chill the mixture until thoroughly cold.
8. Mix the cream and ground sesame seeds into the cold ice cream mixture.
9. Churn the ice cream in an ice cream maker, for around 20 minutes (time may differ according to your machine).
10. Transfer to an air tight container and chill until ice cream sets.
Click here to see the ice cream maker I have (links to amazon). I wouldn't recommend it though, because for some reason the lid doesn't fit on properly to the bottom canister, and the whole top bit wobbles when I switch the machine on.

This was the brand of sesame paste I used. I think I'll use the remaining to make a black sesame chiffon cake.
Summer time!
Sorry for the bad 'joke'. I quote my friend for this...but it did make me laugh! But back to the point. Its summer time, its time for the beach, time for 10 hours of sleep, which also means time for ice cream!
I've had an ice cream maker at home for ages, but I never really tried making proper ice cream until last summer. I tried out many new things last summer because my holiday was super long (since I just had my GCSE exams) and had nothing much to do, so I baked a lot and tried many new things!
The first flavour of ice cream up this year is something special that I haven't tried before - Goma (Black Sesame) Ice Cream. This Japanese flavour gives off a rich nutty aroma, contrasting with the creamy texture of the ice cream. Two forms of black sesame is used to enhance the flavour - sesame paste and ground sesame seeds, which resulted into an ice cream that is way more flavourful than the store-bought ones. Even my mum who doesn't have much of a sweet tooth loved it!
Goma (black sesame) Ice Cream
Adapted from Ice Cream Book, by Junko Fukuda (original recipe in Chinese)
60g Black sesame paste
180ml Milk
2 Egg yolks
70g + 2tbsp sugar (measure separately)
120ml Whipping cream
1tbsp Ground black sesame seeds
1. In a large bowl, whisk together 2 tbsp of sugar with the black sesame paste until smooth.
2. In a separate large bowl, whisk together 70g sugar and the egg yolks until pale yellow.
3. Heat the milk in a small saucepan until just about to boil.
4. Mix the yolks and the milk, adding the milk in small portions (so you don't end up with scrambled eggs!)
5. Pour the mixture (the custard) back into the pan. Heat the mixture over low heat, stirring constantly until the mixture thickens - it should coat the back of a wooden spoon.
6. Strain the custard. Mix the custard with the black sesame mixture, adding the custard in small portions (or the mixture will separate).
7. Place the bowl over an ice bath to cool, stirring occasionally. Chill the mixture until thoroughly cold.
8. Mix the cream and ground sesame seeds into the cold ice cream mixture.
9. Churn the ice cream in an ice cream maker, for around 20 minutes (time may differ according to your machine).
10. Transfer to an air tight container and chill until ice cream sets.
Click here to see the ice cream maker I have (links to amazon). I wouldn't recommend it though, because for some reason the lid doesn't fit on properly to the bottom canister, and the whole top bit wobbles when I switch the machine on.
This was the brand of sesame paste I used. I think I'll use the remaining to make a black sesame chiffon cake.
It's
black sesame,
ice cream,
japanese