Sunday, October 11, 2009

7

Sun Dried Tomatoes - Pastas and Flatbread

I love tomatoes. Whether it be just eating them in raw slices, or cooked with eggs (Stir fried tomato eggs, a Chinese dish), or in tomato soup, or in the sauce in a pasta dinner...but one thing I have been longing to try is sun dried tomatoes. I've come across this ingredient many times before both in cooking and baking recipes, but I only bought my first jar of sun dried tomatoes in oil and the dried ones a month or so ago, after years of wanting to try one (although it may be a basic staple in western households, they were actually really hard to get hold of in Hong Kong!)

When I got home with my beloved jar, I immediately popped open the lid, snipped half a tomato, and ate it. Mmmm. The flavour is hard to describe - sweet, yet a little sour, with a deep flavour that I was hooked with at the first instant. With the ones in oil, I made the Sun Dried Tomato Pasta Salad from Pioneer Woman and a Pesto Pasta from Use Real Butter. Both were delicious as they contained my newest favourite condiment and well, Parmesan cheese.

As for the baking side, I bought another variety of the sun dried tomatoes - the dehydrated packaged ones and used them for a Sun Dried Tomato Flatbread. Thinking about it, the last time I made bread was way back in...April! I was sure excited about making this, and I thought the dough wouldn't be hard to handle, but unfortunately, the dough was super sticky and I had to add around a whole extra cup of flour to get the dough firm enough for me to even knead it.

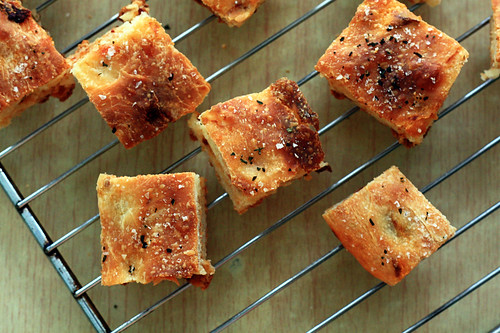
So, when the kneading was done (which took a while, but I'm not complaining - the action of kneading is just so relaxing and allows me to punch, whack and tear it as much as I want) I let it rise (which took a while too, because I forgot to preheat the oven to create the 'warm environment' for the yeast to do its thing) and finally, it was done and the whole flat smelled heavenly! I pulled it out of the oven just to find that the sun dried tomato pieces I placed on top were burnt. But fortunately, it didn't stick down, so I picked them off, resulting in the ugly surface. I immediately cut off a bit to try, and it was so good.

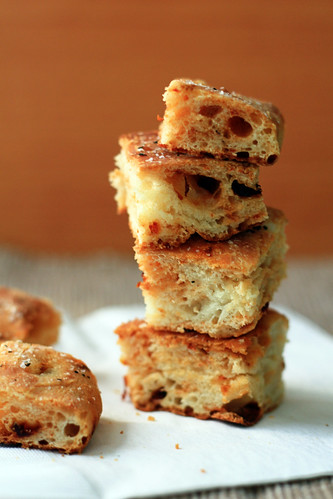
So taste wise, it didn't disappoint! The mildly sweet tomato pieces in the bread was a great contrast to the crunchy sea salt on the surface, and the dried basil really rounds the whole thing off with a lovely, mellow, Italian flavour. And the texture is something between a thick crust pizza and bread, but slightly crunchy crust is definitely the best bit!

I still have a few dried tomatoes left, so I think I'm going to make more bread with them too - maybe some tomato buns. Since I'm on Challenge Week and half term holiday (which means no school for two weeks, but nonetheless, a heap of work to be done), hopefully I can set aside more time to bake and update this space more!

Sun Dried Tomato Flatbread
Adapted from Donna Hay Magazine, via Evan's Kitchen Ramblings

2 tsps active dry yeast
1 tsp caster sugar
1 1/3 cup lukewarm milk
2 1/2 cups plain flour (I had to add almost an extra cup of flour)
1 tsp table salt
1 tbsp olive oil + extra for brushing (I used the oil from the jar of oil soaked sundried tomatoes)
1/2 cup/1 oz sundried tomatoes, rehydrated and snipped into small pieces
sea salt, for topping
dried basil, for topping

1. Place the yeast, sugar and milk in a bowl and mix to combine. Set aside in a warm place for 5 mins or until bubbles appear on the surface.
2. Place the flour, salt, tomato pieces, oil and yeast mixture in a bowl and mix until a smooth dough forms. Knead on a lightly floured surface or a standmixer fitted with a dough hook for 5 mins or until smooth & elastic. (I kneaded by hand, took around 20 minutes and adding extra flour to get it to the right consistency)
3. Place dough in an well-oiled bowl and cover with a tea towel and set aside in a warm place for 30 mins or until doubled in size. Punch dough down to release air. Press dough in baking tray, brush with olive oil, sprinkle with sea salt and dried basil. Bake in a preheated oven of 180C for 15 mins or until golden.

Sunday, September 27, 2009

16

I'm Back, with Matcha and Cocoa Snowballs!

It's been a month. A month since school started, meaning a long lonely month without any baking done. I miss my spatula dearly. I miss carefully weighing out ingredients. I miss the familiar 'ding' sound the oven makes when the baking time is over. I miss taking photos of the end product and then munching it away with satisfaction.

Being a Year 13 student is not easy, the work just comes crashing on us like waves and never stops. Even baking has to step aside as I prioritise university applications, personal statements, tests and internal assessments first.

The list is endless.


But thankfully, I finally got the chance to breathe, take a break and bake something last week. My friend C., whom I've known since kindergarten, keeps on reminding me during our French lessons to bake and update my blog. She's one of the few people that reads my blog (she even showed her mum!), and it's always nice to know that other people appreciate what I do. So a shout out here to C. - Thank you for all the encouragement! :D

The name of these little treats might be a little confusing - the snowballs, in fact are just matcha and cocoa cookies dusted in icing sugar, so they resemble snowballs. But texture wise, they resemble snow too - because they melt in your mouth. They are so addictive it's hard not to pop these small little cookies into your mouth one by one until they're all gone!


They are incredibly easy to make, and I really enjoyed making them as I weighed the dough out equally and rolled them in my palms until each was a perfect sphere. Unfortunately, maybe the oven temperature was not correct or maybe because I didn't chill the dough overnight, they flattened out a bit so they are more like, snow domes. The dough is quite versatile too - I'd imagine that the matcha and cocoa powder can be swapped with espresso powder to create a coffee flavour.


Once they were properly cool and well dusted with icing sugar, I packaged them into small plastic bags as (extremely belated) birthday gifts - one for C., and the other for A., whom I chat to every single Biology lesson. So, Happy 17th to those girls!

Right, so back to work for now. I hope that I'll get to do some more baking soon!

Matcha and Cocoa Snowball Cookies
Adapted from Vanlily Sweetie Life (original recipe in Chinese)

Makes 25-30 (both flavours combined)

90g Butter, at room temperature
Pinch salt
30g Icing sugar
50g Ground almonds
100g Cake flour
6g Matcha powder
10g Cocoa powder
Icing sugar, for dusting

1. Using a wooden spoon, beat the softened butter and icing sugar until well combined.
2. Sift in the ground almonds and cake flour, mix well.
3. Spilt the dough in half. Gently knead the matcha powder into one portion, and the cocoa powder into the other portion.
4. Wrap the two doughs separately with plastic wrap and chill for 30 minutes. (original recipe says to chill overnight)
5. Preheat oven to 170 C.
6. Working with one dough at a time, take 10g of dough and shape into balls. Place them on a parchment lined baking sheet. Repeat until all the dough is shaped.
7. Bake for 15-30 minutes until lightly coloured.
8. Let cool for a while, and transfer them to a cooling rack. Whilst the cookies are still warm, dust them with icing sugar.
9. When thoroughly cool, dust again with icing sugar and store in an airtight container.

Saturday, August 22, 2009

14

Matcha Shortbreads + 7 Things

I'm back to school! Year 13, my last year of high school. We started school on Friday (strange, eh?) and on Thursday I was so sick of writing my extended essay I decided to ditch it and went to bake instead. I think I definitely deserved that baking session because I was working non-stop for the last week already!

matcha green tea shortbread cookies
I digress. Back to these shortbreads, these wonderful shortbreads. I know that they were all the rage around two years ago amongst many food bloggers, and I am the extremely untrendy latecomer that chose to bake these two years later on a whim. But I'm glad I did, because after the first bite, the recipe went straight to my keepers list. And of course I'm talking about the famous Kelli's Green Tea Sweets!

matcha green tea shortbread cookiesThey are buttery and crumbly, and the green tea flavour was prominent enough to be noticed, but not overpowering that the whole thing tastes bitter. And the texture is lovely too - delicate and melt-in your mouth, but surprisingly both the dough and baked cookie held up really well. The shade of green came out perfectly - I thought that the matcha might have lost its colour after baking - I think the colour is very pretty! Along with the teeny crunch from the granulated sugar, it's currently ranking high in my favourite cookie list.

matcha green tea shortbread cookies---
I also recieved the 'Kreativ Blogger' award from 17 and Baking (another teenage baker - yay!). Thanks Elissa!

I'm supposed to write 7 things about myself...

1. I'm planning to study Biochemistry. Yeah, that's what I want to study at uni. Wish my luck in my uni applications (which are starting like....now!) - I am currently working through my personal statement.

2. I wish I could write better. I wish I was able to write more enticing posts, describe food better, but unfortunately, writing is not my forte at all!

3. I have a younger sister. Her name is Venus, and she eats alot of the stuff I make. We laugh at silly things together.

4. The thing I really hate in the world now is IB. Yes, I cannot express my hatred for this thing enough. The workload is so high it's incomprehensible. Normally on a school day, I sleep at 12 at the earliest, and the worst so far - I've stayed up until 3am, working.

5. I'm a Scout! Yep, I am currently a member of my Venture Scout troop, in a Scouts group I've been at since I was 10. I really love camping, because it's just so relaxing and fun when you go crazy with your friends in the middle of nowhere.

6. I really, really, really want to learn how to make macarons. I've only had 3 macarons before in my whole life, and I want to try making them. Unfortunately, after years of thinking 'I'll make it during the holidays' I still haven't gotten round to making them. - Sigh -

7. I love The Pioneer Woman. Pioneer Woman Cooks! was the first food blog I read, I still remember that the post was the Chocolate Sheet cake. Now, I read all the sections of her site, and I secretly wish I can live at a her ranch too.

Aaaand, I'm passing this along to Happy Home Baker, Florence of Do What I Like, Elyn of e's joie and Doreen of Desserts. Yum.
---

matcha green tea shortbread cookies
Have you tried these matcha shorbreads yet? If not, I think you should go make them now!
Alright, I'm going back to work - I'll try to squish in a few posts about some of my other bakes/makes from summer soon!

Matcha Shortbreads
From Lovescool

3/4 cup (2.25 oz; 90g) Confectioners sugar
5 oz (142g) Unsalted butter, cut into cubes
1 3/4 cup (8.5 oz; 219g) All-purpose flour (I used cake flour because I ran out of All purpose)
3 Large egg yolks
1.5 TBS Matcha (powdered green tea)
1 cup (200g) Granulated sugar (for coating)

1. Preheat the oven to 350F (175 C). Line a sheet pan with parchment paper.
2. Whisk the confectioner’s sugar and green tea together in a bowl. Add the butter and green tea/sugar mixture to the bowl of a stand mixer fitted with the paddle attachment. Mix until smooth and light in color.
3. Add the flour and mix until well combined.
4. Add the egg yolks and mix just until the eggs are fully incorporated and a mass forms.
5. Form the dough into a disk and chill in the refrigerator until firm (about 30 minutes).
6. Roll the dough out to ½” (around 1cm) thickness.
7. Cut the dough with a leaf cookie cutter.
8. Toss each cut cookie in a bowl of granulated sugar to coat.
9. Place the sugar-coated cookie on a parchment lined pan. Bake at 350F (175 C) for 12-15 minutes, or until slightly golden around the edges.


Matcha Shortbread Cookies on Foodista

Monday, August 10, 2009

14

Chocolate Espresso Mousse Cake

This cake was made for a dear friend, that I've known since I was 10. I got to know her in Scouts. We see each other once a week, hangout on Saturday afternoons before our weekly Scout meeting, experienced hikes and camps together and it's been the same for 7 years! And, a few weeks ago it was her 18th birthday.


We just hanged out at her house with our normal group of friends, played some crazy twister and the UNO stacking tower, where the losers had to pick out a punishment from a bag. One of them involved kissing a plant, and I won't mention the crazier and disgusting ones here! We cut the cake at midnight, left a few slices for her parents and polished off the remaining next morning.


The recipe is from Tartlette, but I made a few modifications and additions to it. This chocolate cake is really a keeper, because it's moist and chocolaty, but also with a lovely soft texture that's not too dense. It would work really well with many other cakes. Maybe it's just the clumsy me, but I think its a bit fragile because I always tend to break it a bit when handling it! I brushed on some simple syrup spiked with rum to keep it moist because I made the cake layers one day in advance before assembling it.

The mousse is really nice too, albeit a bit rich for our palates. I think I'd cut down on the butter next time. However, it is again simple to make - no need to whip any egg whites and such. It also had a great silky and airy texture that accompanied the cake well. Because I was really scared that the mousse would melt or something in the sweltering heat whilst I was transporting it, I added some gelatine to set it a bit. I added some Varlhona crunchy perles for a bit of contrast, and a simple chocolate ganache glaze to top everything off.


And sorry for the lack of posts recently - in less than two weeks time I'm back at school, and I've got way too much stuff I haven't done. In fact, I'm writing this at the Central Libary right now, where I'm supposed to be working hard on my EE. (Hi Peter!)

Anyhow, I have been baking and making things - so I will eventually get around to posting those, so more will be coming soon!

Chocolate Espresso Mousse Cake
adapted from Tartlette

Serves 12

Cake:
1 stick (113gr) butter
1 cup (200gr) sugar
1/2 cup (45gr) natural cocoa powder
2 eggs
1 1/2 cups (185gr) all purpose flour
1 teaspoon (5gr) baking powder
1 teaspoon (5gr) espresso powder
1/2 teaspoon (2.5gr) baking soda
1 cup (250ml) warm water

Preheat oven to 325F. Butter two 8-inch round baking pans, sprinkle some flour into the pans, shake it around and tap the excess off. Line the bottoms with two 8 inch circles of parchment paper. Set aside.
In a mixer fitted with the paddle attachment, mix together the butter and sugar until light and creamy. On low speed, add the cocoa and mix until incorporated. Add the eggs, one at a time, beating well after each addition. Scrape the bowl with a spatula to make sure they are properly mixed in. Add the flour, baking powder, espresso powder and baking soda and mix on medium-low speed while slowly adding the warm water and mix until smooth. Divide the batter between the prepared pans and bake for 30 to 40 minutes or until a toothpick inserted in the middle comes out clean. Let cool to room temperature and unmold the cakes.

Soaking syrup:
15g sugar
15g water
1 tsp rum

Heat the sugar and water in a small saucepan over low heat until the sugar has dissolved. Let cool, stir in the rum and set aside.

Mousse:
6 oz semisweet chocolate, chopped
1/4 cup (62.5ml) whole milk
1 teaspoon espresso powder
1/2 stick (55gr) butter
1 egg yolk
1 cup (250ml) heavy cream, cold
1 tbsp kahlua
8g gelatine powder
15g water
30g Varlhona crunchy perles (optional)

In a bowl set over a pan of simmering water (make sure that the bowl fits snuggly over the pan and does not touch the water), melt together the chocolate, milk, espresso powder and butter. Remove from the heat and let cool to lukewarm. Meanwhile, sprinkle the gelatine over the water in a small bowl and let it bloom. Heat the bowl in a microwave for 10 seconds to liquefy the gelatine, stir until gelatine is dissolved. Whisk in the egg yolk, kahlua and cool gelatine mixture. In a mixer, whip the cream to medium peaks and fold it into the chocolate mixture. Lightly fold in the crunchy perles.
Ganache glaze:
70g semisweet chocolate, chopped
100g heavy cream
5g butter

Place the chopped chocolate in a bowl. Scald the cream and immediately pour it over the chocolate. Let it sit alone for 30 seconds, then stir until the mixture is smooth. Stir in the butter.

Assembly:
Prepare an 8-inch mousse ring (I don't have a mousse ring so I used a pan with a removable bottom). Place a cake layer on the bottom and soak the surface with the soaking syrup. Pour in the mousse and let it set for 10 minutes or so in the refridgerator. Soak both sides of the second layer with syrup and place it on the mousse. Pour over the ganache glaze and let the whole cake set, for at least 2-3 hours. Decorate as desired.

- I've actually made this cake before way way back in March for another friend. Last time, I added a crispy chocolate feuilltine layer to the mousse to add some extra texture, so you might want to add that if you make this cake.

Monday, July 20, 2009

0

Corn, of the Popped Variety

homemade, popcorn, kettle cornI'm not a huge fan of popcorn. I don't buy it at the movies, because I think it's always just slightly warm, and the freezing air conditioning in cinemas the cools the whole tub of popcorn before the movie even starts. And I believe that popcorn must be eaten fresh and hot, when the caramel is still slightly soft.

homemade, popcorn, kettle corn
Now, but this popcorn - it's the real good stuff. Freshly popped. Nice, warm and crunchy. Just sweet enough so it's not cloying, with a sprinkling of salt to add an extra something to your taste buds. Lightly coated with butter to make it even more tempting to gobble up the whole bowl.

homemade, popcorn, kettle corn(Random point: Hmm my fingers look really dark here. And short. And stubby...)

And, it takes less than 10 minutes to whip up. (But it also disappears in 10 minutes.)

I think I've found the perfect homemade snack for homework sessions. Heck, it's so good and easy to make, I might actually pop my own corn for the movies!

Homemade Popcorn
Adapted from Joy the Baker

1/2 cup popcorn
1/8 cup vegetable or grapeseed oil
Knob of butter
3 tablespoons sugar
1/2 teaspoon salt (adjust according to your own taste)

1. Heat oil and butter in a large, heavy saucepan over medium heat. Make sure that it’s a pan that you can easily lift and shake in the air. Yea… you’ll also want to have two pot holders on hand.
2. Once the oil is hot, pour in the popcorn, sprinkle sugar on top and cover.
3. It will take a few minutes for the first pops, but once the popcorn starts popping, shake continuously until the popcorn is popped. This means that, once the popcorn really starts going, you’ll want to grab the pot with your pot holders, securing the lid, and shake the pot above the flame of the stove for a few seconds, return to the heat, and repeat this process several times throughout the popping process. This will prevent the popcorn from sticking to the bottom of the pan and burning.
4. Transfer to a serving bowl and salt lightly. Mix with a big spoon. The sugar will still be hot, and the popcorn may be sticky. Don’t burn your hands on hot sugar. The popcorn will dry as it cools. Makes 8-10 cups.

Blog Widget by LinkWithin