What's a birthday without a cake, right? Usually, if time permits, I'd try my best to bake cakes or other treats for my friends when their birthday comes.
Hmm, let's count. The last one was a chocolate chiffon cake. Then it was a chocolate cheesecake. Oh, and the
chocolate espresso mousse cake.
Two of those, in fact. Chocolate
cupcakes, chocolate
tarts...Can we sense a theme here? :D
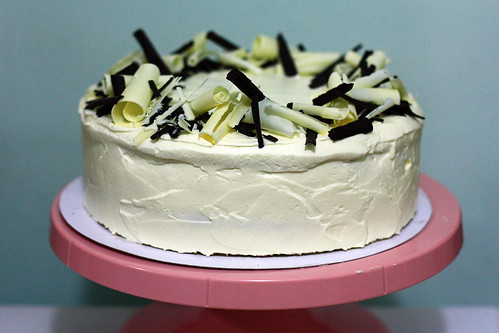
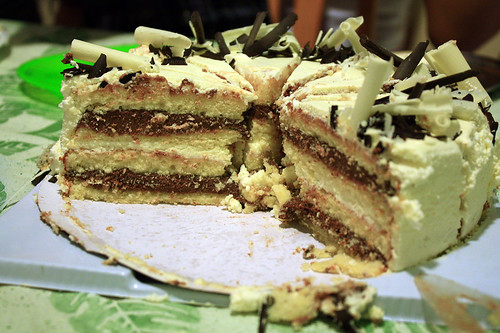
But for A., whom this cake was for, of course it had to be chocolate too - only both Black and White chocolate. As this year is the last time I'm going to celebrate my friends' birthdays with them before we go our own ways for uni, I promised myself that I have to bake them each a big, special birthday cake.

But making it special is not as easy as it sounds. This is the first time I've ever made a birthday cake with
mulitple layers and fillings and
frostings. Heck, I only bought my first offset spatula two days before! Even with my planning beforehand, I still encountered some problems, partly due to my clumsiness but mainly because I've never made such a cake before, I totally did not know what to expect and I panicked
alot when...
...I was slicing the cake layers. I held the knife in one hand, and stared at the cake layer that was barely an inch high.
How on earth do I slice that in half without accidentally slashing in the wrong direction? I took a deep breath, and gently sawed through the cake later. Phew. Although the layers were not particularly even, at least they held up! As the cake layers are quite soft and fluffy, I
quickly stuffed them into the freezer to make sure they didn't snap in half of something. So the first scare was over.
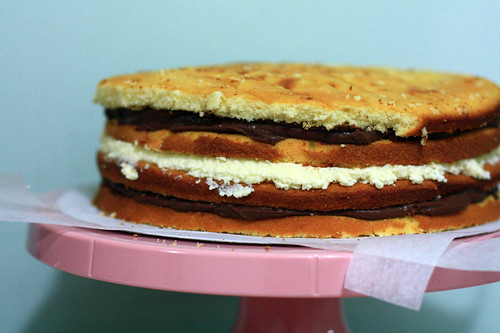
...I frosted the layers. I'm not sure why, but I had a huge problem with the white chocolate whipped cream. See that ugly white layer in the photo above? Yeah, that. It was
perfectly fine after I initially whipped it up - it was smooth and just firm enough to spread, but as per the recipe's instructions, I chilled it for around 2 hours. And after that, I took it out. I prodded it through the plastic wrap. The surface was firm.
Not good.
It turned out that somehow, the cream had curdled in fridge, and I didn't have a backup plan. So I went ahead and used it for the middle layer, but it just looked too way bad and unappealing to be the frosting. So I sprinted down to the supermarket, grabbed another carton of whipped cream, ran back and whipped up some lightly sweetened cream and used it to frost the cake instead. It took me ages to get the frosting right, as I've never frosted a big cake before and it was hard to get the crumb coat right, to get the top and sides smooth.

But finally, the cake was done. The top was simply decorated with homemade white chocolate curls and some store bought dark chocolate shavings. I quickly photographed it, and went to sleep - tired, yet happy that I found an alternative to the white chocolate cream disaster. But I was anxious too, as I was very very scared that the white chocolate cream I used for the filling would
separate over the night, and mess up the whole cake.

But the next night, after our long day of Challenge Week golfing, 9 holes, a barebeque... it was cake time! We took the photos, sang the song, the birthday girl made her wishes...and finally it was time for me to slice and serve the cake. I took a deep breath in my brain, and cut the cake into slices.
All was well. I simply cannot describe how relieved I was to see that the slices came out nicely and the white chocolate cream filling was perfectly fine! And it was actually somewhat symmetrical with the layers looking fairly intact!
So everyone had their slice, and everyone said it was
goooood. I felt satisfied and bubbly and excited and happy to see that everyone enjoying it, and that my first layered cake was successful, that everything turned out fine eventually albeit the glitches in the process. So I rightfully dug into my slice to taste the fruit of my labour.
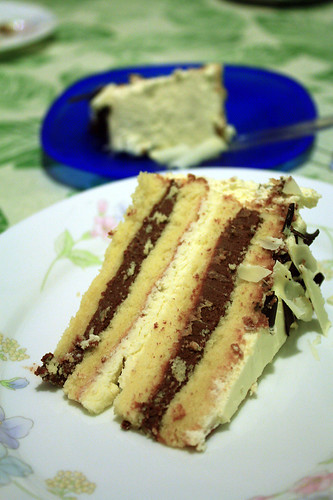
Well, since the cake was made with a
fluffy buttermilk white cake, a
rich dark chocolate pastry cream,
real white chocolate cream and well, more
sweetened whipped cream (and of course the love and effort I put in too), it was just simply
decadent. The smooth creams complemented the cake well, and the sweetness was just right so the flavours of both chocolates came through. In fact, I was glad that I used whipped cream for the frosting, as it helped round all the layers together nicely and so the cake is not too heavy and cloying.
If you're a chocoholic for both chocolates that's looking for a cake to bake, why not this? The recipe is from
Dorie Greenspan's Baking from My Home to Yours. The recipe can be found on this
site. (Sorry, I'm too tired to type it all up :P In fact, A. was the person who helped me order this book from Amazon, so what's better to bake a cake from that book for her?)
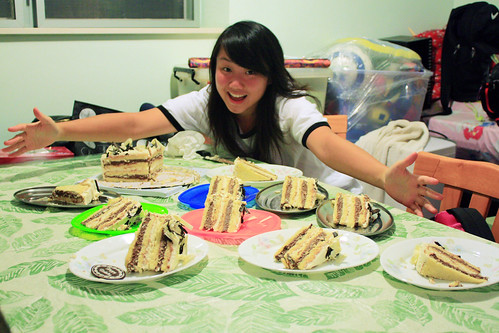 Happy Birthday for the nth time A.! I'm really really glad you liked the cake!
 Although layered cakes are probably a no-brainer for practically everyone but me, to myself, it seems like I've reached a mini baking milestone. And honestly? I can't wait to bake the next big-special-birthday cake!
P.S. Actually I had my 17th birthday a few weeks ago too, in case anyone wondered why the 'About Me' section has changed :)

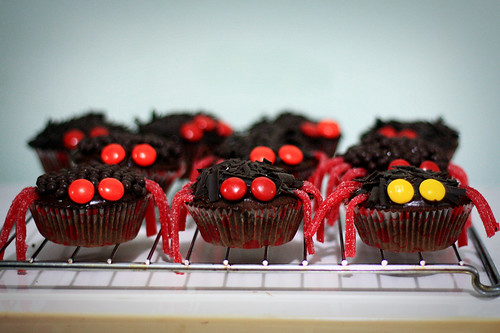 This may be a bit late for Halloween - it's still the 31st here, so maybe just in time! Halloween's not a huge thing here in Hong Kong - I've never even dressed up before for Halloween! Usually my friends and I would go to the annual Halloween Bash at Ocean Park (a theme park), but this year we're just all too busy, so I baked a batch of Spider Cupcakes to mark the occasion.
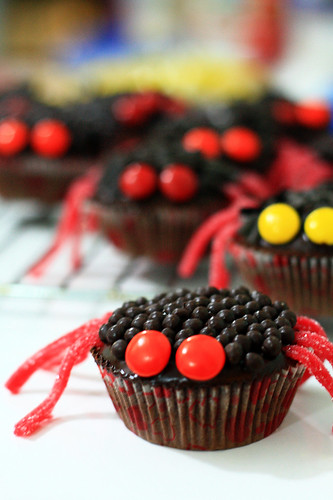 Of course, the last thing I'd like to dress up as, or see during Halloween are spiders. But I wouldn't mind having a spider morphed from a chocolate cupcake, with a generous slather of chocolate frosting, and sprinkled with more chocolate. I think they look cute, no?
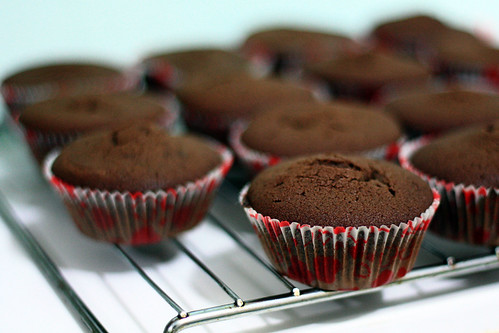 The chocolate cupcake recipe I used was from Dorie Greenspan's Baking from My Home to Yours, and the idea for decorations were from Bakerella. I was a bit disappointed with the cupcake because the crumb was very loose and the chocolate flavour was not deep enough. I defiantly going to stick to my favourite chocolate cupcake recipe in the future. The glaze, however, was nice and hassle-free to make. Made up of simply 3 ingredients - melted chocolate, butter and icing sugar - it tasted wonderful and had a lovely sheen to it.
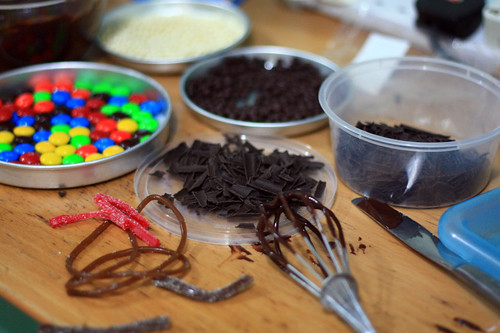 To transform the cupcakes into scary, chilling arthropods, I used chocolate shavings or Varlhona crunchy pearls as the 'exo-skeleton', strawberry licorice for the legs and M&Ms for the eyes. I know that the heart-studded cupcake liners are hardly Halloween-ish, but that's all I had at home!
 So after the transformation, I preserved them in a box in the fridge over night, and bought them to school for my friends to catch and devour. (In fact, some of my friends actually ate REAL spiders in Cambodia during Challenge Week! Cool, right?)
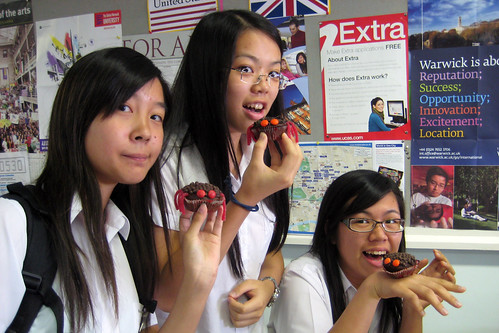 And finally as a Biology student, I do actually know that spiders have 8 legs (...but not without asking a friend first!), but I couldn't fit on 4 pairs - so theoretically all my spiders were disabled spiders!
 Here's me being a 'ghost', taken by myself using the self timer on my camera. If you're out for Halloween, it'd be something fun to do! Check out Photojojo for the tutorial. Aaand, Happy Halloween to you all!